- 022 315 8987
- info@myhomesconstruct.co.nz
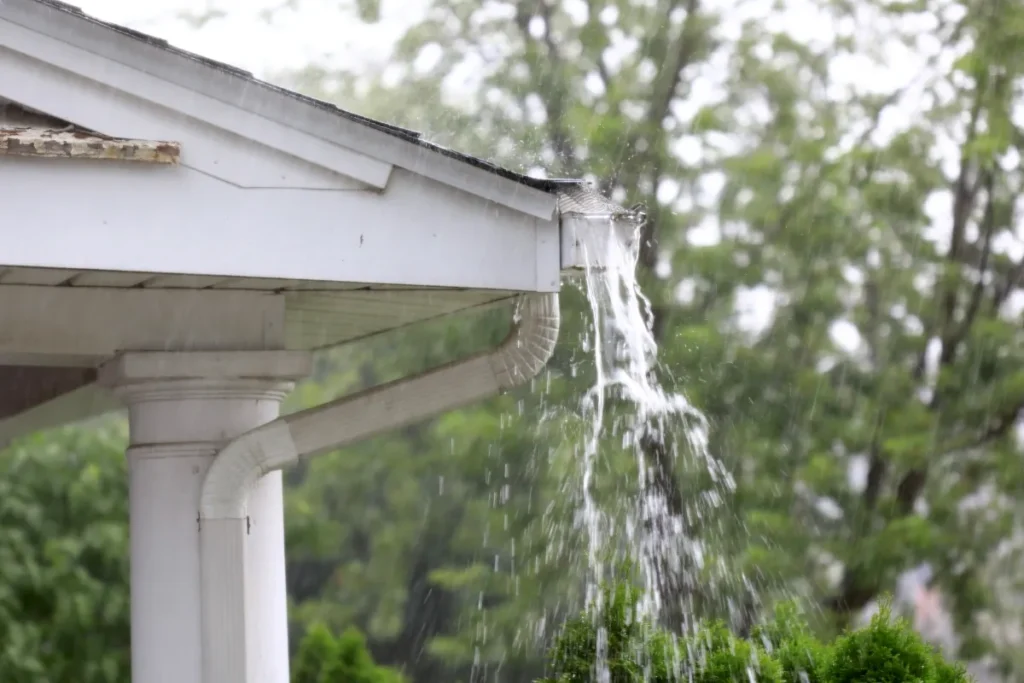
Gutters are the unsung heroes of your home, silently channeling rainwater away from your roof, walls, and foundation. But when a gutter joint starts leaking, that quiet efficiency turns into a dripping nightmare. For homeowners in Auckland—or anywhere with unpredictable weather—fixing a leaking gutter joint is a must-have skill. Left unchecked, even a small leak can snowball into costly problems like water damage, mold growth, or soil erosion.
This comprehensive guide is designed for homeowners, DIY enthusiasts, and property managers who want to tackle gutter repairs with confidence. As a roofing specialist and gutter repair expert, I’ll walk you through why gutter joints leak, how to fix them step-by-step, and how to maintain your gutter system for years to come. Whether you’re dealing with aluminum, PVC, or copper gutters, this article has you covered with practical, cost-effective solutions. Let’s get started!

A tiny drip might not seem like a big deal, but gutter joint leaks can cause havoc over time. Here’s why addressing them pronto is crucial:
Last year, a homeowner in Auckland’s North Shore ignored a leaking gutter joint for months. By the time they called My Homes Construct Ltd, water had rotted the fascia board, soaked the wall insulation, and caused $5,000 in repairs. A $20 tube of sealant and an hour of work could’ve saved them the headache. Don’t let that be you!
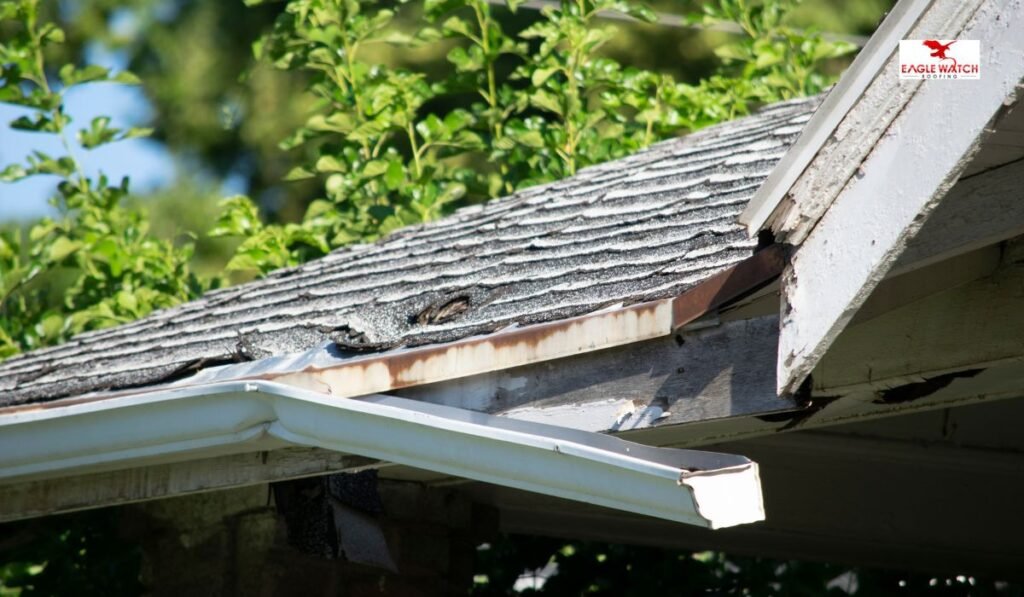
Gutter joints—where two sections of guttering meet—are natural weak points. Here’s why they fail:
For a minor drip, a high-quality sealant might be all you need. But if the joint is cracked beyond repair, rusted through, or misaligned, replacing the section could save you repeated fixes. This guide covers both options so you can choose based on your situation.
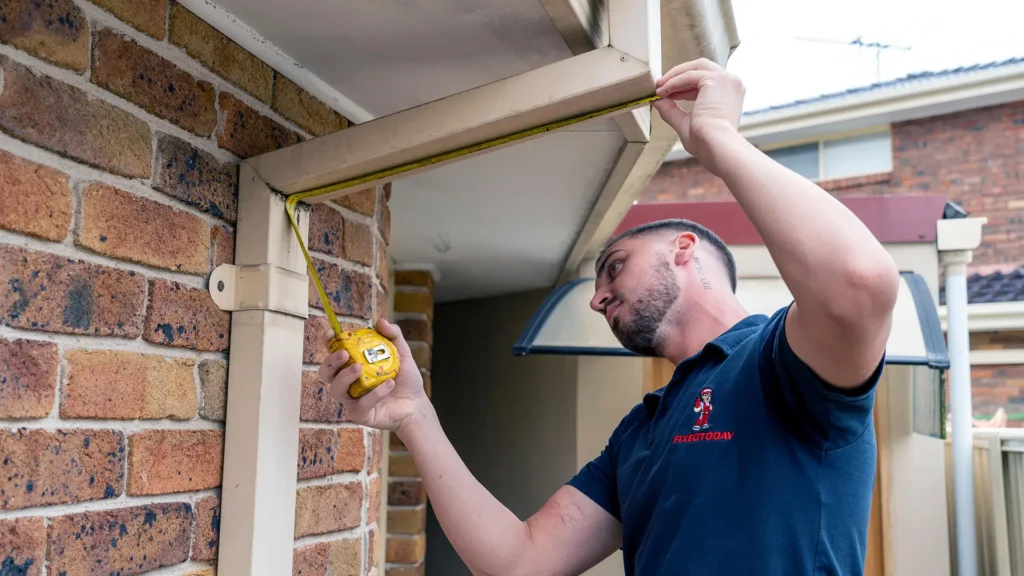
Ready to roll up your sleeves? This expert-approved process will help you fix a leaking gutter joint using affordable tools and materials. Safety note: Always use a stable ladder and wear gloves to protect your hands.
You can’t fix what you can’t see. A thorough inspection ensures you’re targeting the right problem. Skipping this step might mean sealing the wrong area or missing bigger damage.
If water flows out but you can’t see a crack, the leak might be hidden under old sealant or debris. Keep this in mind for the next step.
A clean, dry joint is the foundation of a lasting repair. Dirt or moisture trapped under sealant can cause it to peel or fail within weeks.
For PVC gutters, avoid harsh chemicals—they can weaken the plastic. Stick to soap and water. On copper gutters, a gentle scrub preserves the patina while prepping the surface.
Rushing this step. I’ve seen homeowners slap sealant over wet muck, only to watch it bubble and leak again. Take your time here—it pays off.
The sealant is your first line of defense against leaks. A quality product, applied correctly, can last 5–10 years, even in harsh weather.
If the sealant doesn’t hold after drying, you might’ve applied it too thin. Add a second layer, ensuring it overlaps the edges of the joint by at least 1 cm.
For Auckland’s rainy spells, silicone beats rubberized sealants—it stays flexible through temperature swings and resists cracking.
A loose joint won’t hold sealant long-term. Securing it stops movement and prevents future leaks.
Over-tightening screws can dent or crack gutters, especially PVC. Snug is enough—don’t go Hulk on it.
A property manager in Auckland’s Ponsonby had a joint that kept leaking despite sealant. Turns out, a missing screw let it shift in the wind. Two rivets fixed it for good.
Testing proves your repair works under real conditions. It’s better to catch a flaw now than after the next storm.
If water still leaks, the joint might be too damaged for sealant. Skip to replacement (see below) or call a pro.
A little upkeep goes a long way. Here’s how to keep your gutters leak-free:
✔ Clean Regularly: Clear debris twice a year—spring and autumn—or after big storms. Use a ladder and scoop, or hire a pro for high roofs.
✔ Seal Annually: Apply a thin layer of sealant to joints every 12 months. It’s cheap insurance against wear.
✔ Check for Rust: On metal gutters, sand rust spots with a wire brush and coat with rust-proof paint. Replace sections if rust eats through.
✔ Inspect Downspouts: Clear blockages with a plumber’s snake or hose to keep water flowing.
✔ Trim Trees: Overhanging branches drop leaves and scratch gutters—keep them pruned back.
In Auckland, where rain and wind team up, I recommend checking gutters after every major storm. It’s a 10-minute task that saves hours of repair later.
Sometimes, a fix isn’t enough. Here’s when replacement makes sense:
DIY is great, but some jobs need a specialist:
For Auckland homeowners, My Homes Construct Ltd offers expert gutter repairs and replacements. Call +64 22 315 8987 for a free quote. They’ve saved countless homes from water damage with fast, reliable service.
Q: Can I use duct tape to fix a leaking gutter joint?
A: Temporarily, yes—but it’s not waterproof long-term. Sealant or replacement is better.
Q: How long do gutter sealants last?
A: Quality silicone or polyurethane sealants can last 5–10 years. Check annually and reapply as needed.
Q: What’s the best gutter material?
A: Aluminum is lightweight and rust-resistant, PVC is cheap and easy to install, and copper lasts decades but costs more.
Fixing a leaking gutter joint is a DIY win that saves money and protects your home. With a ladder, a tube of sealant, and an hour or two, you can stop leaks and keep water where it belongs—away from your walls and foundation. Whether you’re in Auckland facing rainy winters or just maintaining a rental property, this guide gives you the tools and know-how to succeed.
Got a tricky leak or a gutter system past its prime? Don’t hesitate to call the pros. For Auckland residents, My Homes Construct Ltd is your go-to for gutter repairs and replacements. Dial +64 22 315 8987 and get a free quote today!
WhatsApp us