How to Fix a Leaking Gutter Seam

Leaking gutter seams are a serious concern for Auckland homeowners, where heavy rainfall and coastal weather can turn a small drip into major property damage. Water escaping through a gutter seam can seep into your home’s foundation, cause mould growth, or damage exterior walls and landscaping. In a city known for its wet climate, addressing these leaks promptly is crucial. Gutter seams often leak due to wear and tear, poor installation, or the natural expansion and contraction of materials. While fixing a leaking gutter seam is a manageable DIY task for many, some situations—like multi-storey homes or extensive damage—call for professional expertise. This comprehensive guide provides step-by-step instructions for repairing a leaking gutter seam, along with preventative tips to keep your gutters in top shape. For complex repairs, My Homes Construct offers reliable gutter services across Auckland to ensure your home stays dry and secure.

Why Gutter Maintenance is Critical in Auckland

how to fix a leaking gutter seam in Auckland NZ

Auckland’s unique climate makes gutter maintenance a priority for homeowners. With an average annual rainfall of around 1,200 mm, according to NIWA, the city experiences frequent downpours, especially during winter and spring. Add to that the coastal salt air and high humidity, and your gutters face constant stress. A leaking seam can lead to:

  • Foundation damage: Overflowing water erodes soil around your home’s foundation, causing cracks or subsidence.
  • Mould and rot: Excess moisture encourages mould growth and wood decay in eaves, fascias, or exterior walls.
  • Roof leaks: Water backing up under roofing materials can damage ceilings and insulation.
  • Pest issues: Stagnant water in clogged gutters attracts pests like mosquitoes, common in Auckland’s humid summers.

Leaking seams are often an early warning sign of broader gutter issues. Addressing them promptly not only prevents costly repairs but also ensures compliance with Auckland Council’s drainage guidelines, which emphasize effective roof runoff control. For DIYers, fixing a seam can be a cost-effective solution, but for more complex problems, professionals like My Homes Construct can provide lasting results.

Common Causes of Leaking Gutter Seams

Understanding the root cause of a leaking gutter seam helps you apply the right fix and prevent recurrence. Here are the primary reasons seams fail in Auckland homes:

  • Age and weather wear: Auckland’s wet, salty climate accelerates corrosion, especially in older metal gutters. Over time, seams weaken, crack, or rust, allowing water to escape.
  • Improper sealing or installation: If seams weren’t sealed correctly during installation, or if low-quality sealant was used, leaks can develop. Misaligned joints also create gaps for water to seep through.
  • Expansion and contraction of metal joints: Temperature fluctuations—common in Auckland’s variable climate—cause metal gutters (like aluminium or galvanised steel) to expand and contract. This movement can loosen seams and break seals over time.
  • Debris buildup: Leaves, twigs, and sludge can accumulate at seams, trapping water and causing overflow. This constant moisture erodes sealant and metal.
  • Physical damage: Storms, falling branches, or even ladder impacts during maintenance can dent or separate seams, leading to leaks.

Identifying the cause is key to a successful repair. For example, if rust is the issue, you’ll need to address corrosion before sealing. If debris is the culprit, regular cleaning can prevent future leaks.

Types of Gutters and Their Impact on Seam Leaks

The type of gutter system on your Auckland home can influence seam leaks and the repair approach. Here’s a breakdown of common gutter types and their vulnerabilities:

  • Aluminium gutters: Lightweight and rust-resistant, but seams can loosen due to expansion and contraction. Auckland’s salty air can also cause pitting if not maintained.
  • Galvanised steel gutters: Durable but prone to rust, especially in coastal areas like Takapuna or Devonport. Rust at seams often leads to leaks.
  • Vinyl (uPVC) gutters: Common in newer Auckland homes, these are rust-free but can crack under UV exposure or extreme temperature changes, compromising seams.
  • Copper gutters: Found in heritage homes in suburbs like Remuera, these are long-lasting but expensive. Seams may leak if solder joints fail over time.

Each material requires specific sealants and repair techniques. For instance, silicone-based sealants work well for aluminium and vinyl, while copper may need specialised products. Knowing your gutter type ensures you choose the right materials for a lasting fix.

Tools & Materials You’ll Need

Before starting your repair, gather these tools and materials to ensure a smooth process:

  • Gutter sealant: Opt for a waterproof, weather-resistant silicone-based sealant rated for outdoor use in NZ’s climate. Look for UV resistance and flexibility.
  • Wire brush or sandpaper: For removing rust, debris, or old sealant from the seam area.
  • Gloves: Protect your hands from sharp edges, rust, and chemicals in the sealant.
  • Ladder: A stable ladder suited for your roof height, ideally with a stabiliser bar for safety.
  • Garden hose: To test for leaks before and after the repair.
  • Cleaning cloths: For wiping down and drying the seam area.
  • Screws and a screwdriver/drill: Rust-resistant screws for resecuring loose gutter sections.
  • Safety gear: Non-slip shoes and eye protection for working at heights.
  • Scraper or putty knife: To remove old sealant or caulk.
  • Bucket and trowel: For clearing debris from the gutter.
  • Rust-proofing spray: For metal gutters, to prevent future corrosion.

Tip: Source materials from local Auckland hardware stores like Mitre 10 or Bunnings, which stock sealants and tools suited for NZ’s weather. Look for products labelled for “marine environments” to handle Auckland’s coastal conditions.

Step-by-Step Guide to Fixing a Leaking Gutter Seam

Follow this detailed guide to repair your leaking gutter seam and restore your system’s functionality. Each step is tailored for DIYers, with safety and effectiveness in mind.

1. Safety First: Use Ladder Safely, Wear Gloves

Working at heights can be dangerous, especially in Auckland’s often-wet conditions.

  • Set your ladder on flat, stable ground, ensuring it extends at least 1 metre above the gutter for safe access.
  • Use a ladder stabiliser or have someone hold the base to prevent tipping.
  • Wear gloves to protect your hands from sharp edges, rust, and sealant chemicals.
  • Wear non-slip shoes and eye protection to guard against debris or falling objects.
  • Avoid working in wet or windy conditions—Auckland’s unpredictable weather can make ladders slippery.

Callout: Never overreach while on the ladder; reposition it as needed to stay balanced and safe.

2. Clean the Seam Area Thoroughly

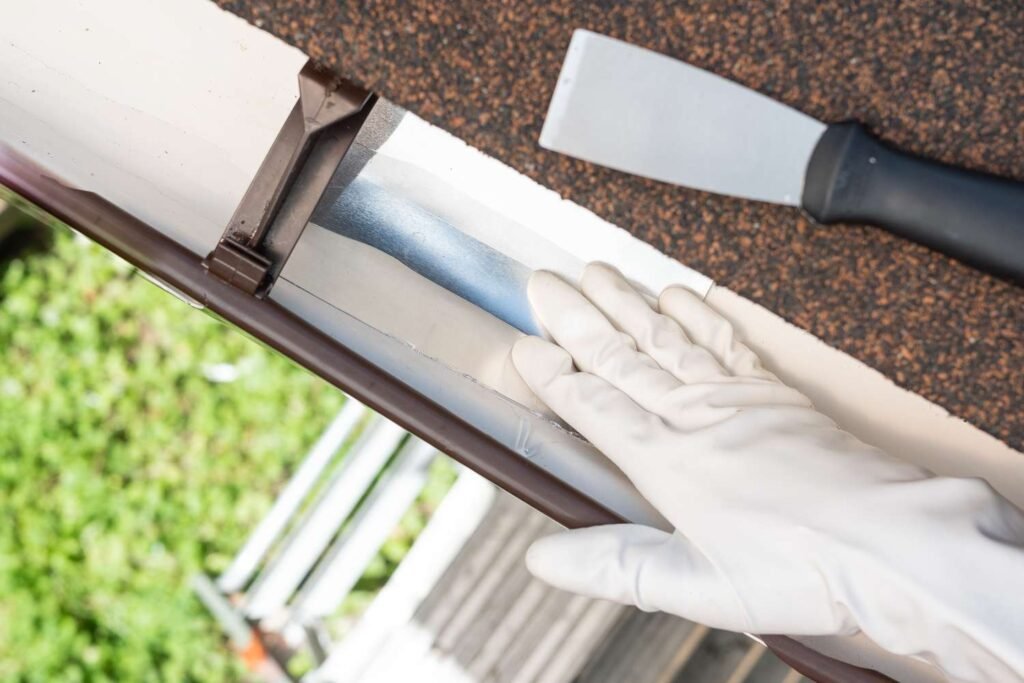
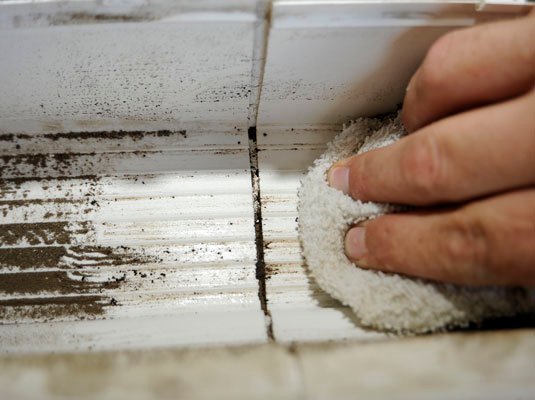
Debris, dirt, and algae can prevent a good seal, so thorough cleaning is essential.

  • Use a trowel or gloved hand to remove leaves, twigs, or sludge from the gutter near the seam.
  • Rinse the area with a garden hose to clear fine particles and dirt.
  • Wipe down the seam with a cleaning cloth to ensure it’s free of grime or algae, common in Auckland’s humid climate.
  • For stubborn buildup, use a mild detergent and scrub gently with a brush.

A clean surface ensures the new sealant adheres properly, creating a watertight bond that withstands heavy rain.

3. Remove Old Sealant and Rust

Old sealant or rust can compromise your repair, so take time to prep the seam properly.

  • Use a scraper or putty knife to gently remove old, cracked sealant from the seam.
  • Scrub the area with a wire brush or sandpaper to remove rust or corrosion, especially on metal gutters like galvanised steel.
  • Focus on the seam and a 5 cm radius around it to ensure a smooth, clean surface.
  • For aluminium or copper gutters, sand lightly to avoid scratching the surface.

This step ensures the new sealant bonds effectively, preventing future leaks.

4. Dry the Surface Completely

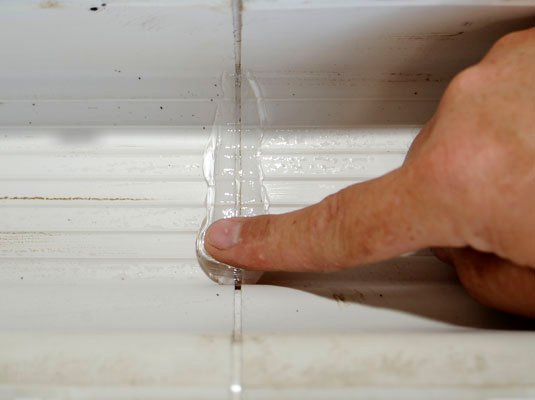
Sealant won’t adhere to a wet surface, so drying is critical for a successful repair.

  • Wipe the seam area with a dry cloth to remove any moisture left from cleaning.
  • Let the gutter air-dry for 10–15 minutes, or use a hairdryer on a low setting to speed up the process.
  • Check for water pooling in the gutter and remove it with a cloth or sponge.
  • Ensure the seam is completely dry to the touch before proceeding.

A dry surface allows the sealant to cure properly, ensuring a durable, leak-proof seal.

5. Apply New Gutter Sealant

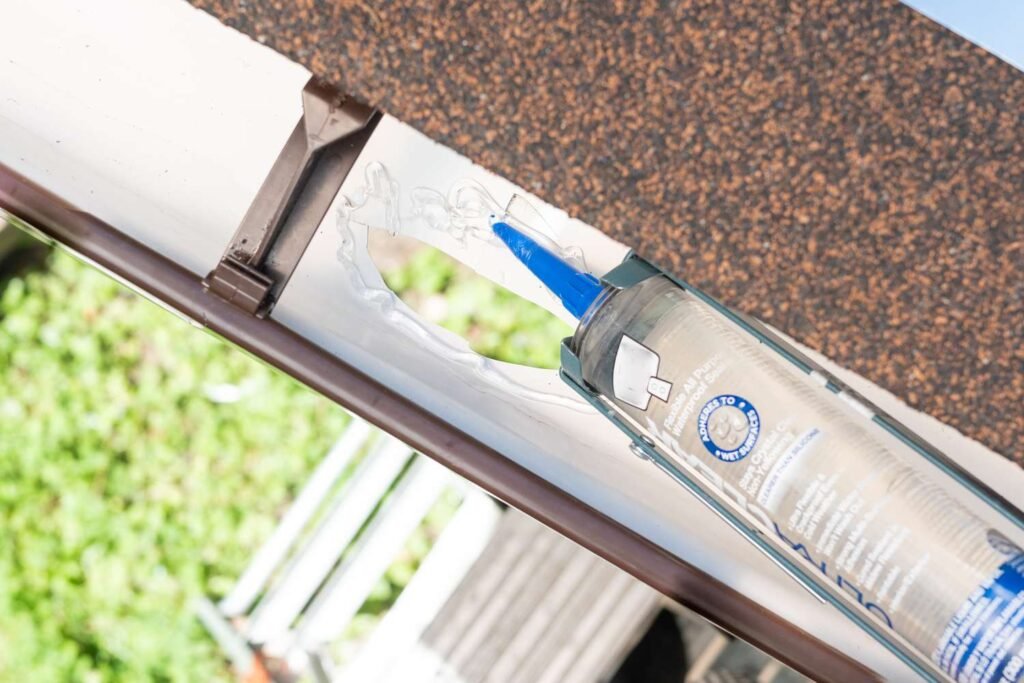
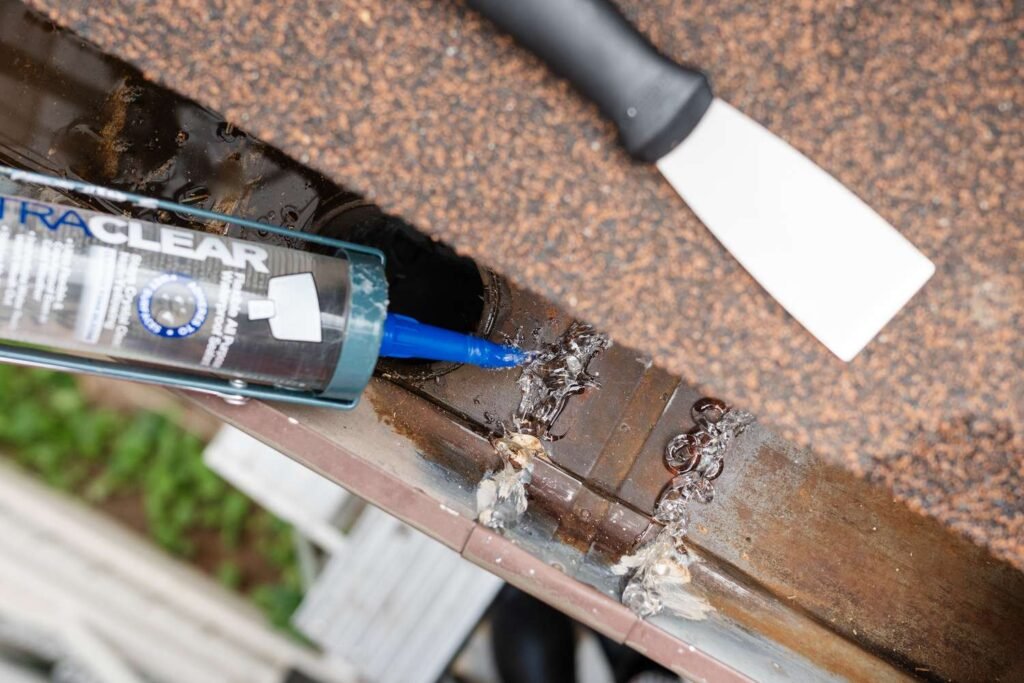
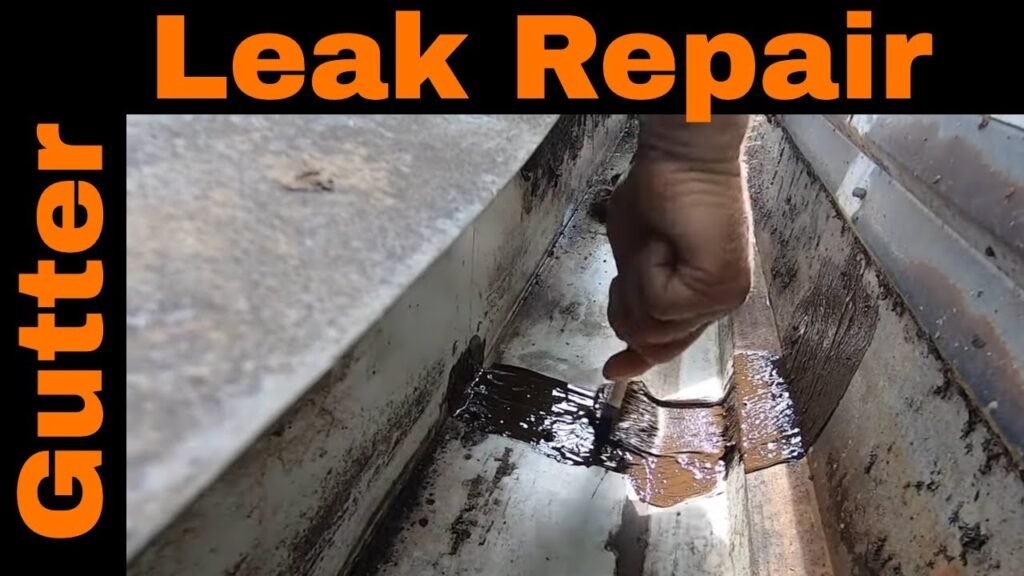
Now it’s time to seal the seam and stop the leak.

  • Cut the sealant tube’s nozzle at a 45-degree angle for precise application.
  • Apply a continuous, generous bead of silicone-based sealant along the seam, covering both sides of the joint.
  • Smooth the sealant with a gloved finger or a caulk tool to ensure even coverage and eliminate air gaps.
  • Extend the sealant 2–3 cm beyond the seam on both sides to prevent water seepage.

Tip: Choose a sealant rated for flexibility and UV resistance, as it can handle the expansion and contraction of gutters in Auckland’s variable climate.

6. Reattach or Secure Sections if Needed

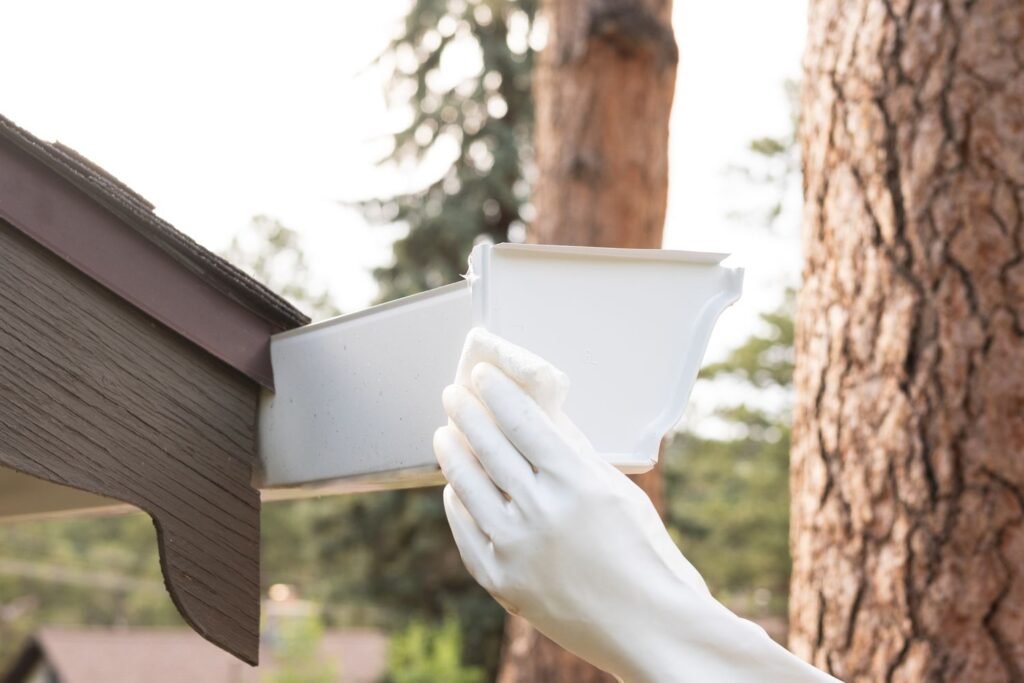
If the seam has separated or the gutter is loose, securing it prevents future leaks.

  • Inspect the gutter sections around the seam for looseness or misalignment.
  • If loose, drill pilot holes and fasten with rust-resistant screws, spacing them about 10 cm apart.
  • Ensure the gutter maintains a slight slope (1 cm per 3 metres) toward the downspout for proper water flow.
  • Tighten screws just until snug—overtightening can warp the gutter or crack vinyl systems.

Proper alignment ensures water flows smoothly, reducing stress on the seam and preventing overflow.

7. Test Your Work with Water Flow

Testing confirms your repair is effective and prevents future damage.

  • Run water through the gutter using a garden hose, starting at the highest point of the system.
  • Observe the seam for drips, leaks, or pooling, checking both inside and outside the gutter.
  • Verify that water flows freely to the downspout without backups or overflow.
  • If leaks persist, dry the area, reapply sealant, and test again until the seam is watertight.

Testing ensures your gutter can handle Auckland’s frequent downpours, protecting your home from water damage.

Pro Tips to Prevent Future Leaks

Preventing leaks saves time, money, and stress. Here are expert tips to keep your gutters in top condition:

  • Inspect gutters twice a year: Check for cracks, rust, or loose seams, especially after winter storms or summer heat. Early detection prevents bigger issues.
  • Use high-quality sealants: Opt for silicone-based products rated for NZ’s weather, with UV resistance and flexibility to handle temperature changes.
  • Install gutter guards: These reduce debris buildup, preventing blockages that stress seams and cause overflow, a common issue in leafy Auckland suburbs like Epsom.
  • Clean regularly: Remove leaves, twigs, and sludge to ensure proper water flow, especially during Auckland’s rainy seasons in autumn and winter.
  • Check for proper slope: Ensure gutters slope toward downspouts to avoid water pooling at seams, which can weaken seals over time.
  • Monitor for rust: In Auckland’s coastal climate, apply rust-proofing spray to metal gutters annually to prevent corrosion.
  • Seal proactively: Even if seams aren’t leaking, reapply sealant every 3–5 years to maintain a watertight bond.
  • Avoid overloading: Don’t hang heavy decorations (like Christmas lights) on gutters, as this can pull seams apart.

Visual Suggestion: Include a diagram showing proper gutter slope and seam sealant application, or a before-and-after photo of a repaired seam for clarity.

When to Call a Gutter Professional

While DIY repairs are great for minor leaks, some situations require professional expertise:

  • Large cracks or separation: Significant damage may require seam replacement or new gutter sections, beyond a simple sealant fix.
  • Multiple leaks across seams: Widespread issues often indicate systemic problems, such as poor installation, sagging, or material failure.
  • Two-storey homes or difficult rooflines: High roofs pose safety risks and require specialised equipment like scaffolding or cherry pickers, common in Auckland’s hilly areas like Parnell.
  • Compliance concerns: Professional repairs ensure adherence to NZ Building Code Clause E2 (External Moisture), which governs roof runoff and drainage.
  • Heritage homes: Older properties in suburbs like Ponsonby may have unique gutter systems (e.g., copper) that need specialised care to preserve their value.

My Homes Construct offers expert gutter repairs in Auckland, delivering durable solutions with warranties for peace of mind. Our team ensures your gutters meet local standards while keeping your home safe.

Comparing DIY vs. Professional Gutter Repairs

Deciding between DIY and professional repairs depends on your skills, the extent of the damage, and your home’s layout. Here’s a detailed comparison to help Auckland homeowners choose:

  • DIY Repairs:
    • Pros:
      • Cost-effective: You only pay for materials, typically $20–$50 for sealant and tools.
      • Quick for minor fixes: A small seam leak can be fixed in an afternoon.
      • Empowering: Gain hands-on experience maintaining your home.
    • Cons:
      • Safety risks: Working at heights, especially on two-storey homes, can lead to falls.
      • Limited scope: DIY fixes may not address underlying issues like sagging or poor installation.
      • Time-intensive: Cleaning, prepping, and testing can take several hours.
  • Professional Repairs:
    • Pros:
      • Comprehensive: Professionals identify and fix systemic issues, like improper slope or extensive corrosion.
      • Safe: Trained teams use scaffolding and safety gear, ideal for high or steep roofs.
      • Compliant: Repairs meet NZ Building Code standards, crucial for resale or insurance purposes.
      • Warrantied: My Homes Construct offers guarantees on labour and materials.
    • Cons:
      • Higher cost: Professional repairs may range from $200–$500, depending on the scope.
      • Scheduling: You’ll need to book in advance, which may delay urgent fixes.

For minor seam leaks on single-storey homes, DIY is a practical choice. But for complex issues or safety concerns, professionals like My Homes Construct provide long-term value and reliability.

Common Mistakes to Avoid When Fixing Gutter Seams

Even experienced DIYers can make mistakes that lead to recurring leaks. Here’s what to watch out for:

  • Skipping cleaning: Debris or algae prevents sealant adhesion, causing leaks to reappear.
  • Using the wrong sealant: Indoor or non-flexible sealants break down quickly in Auckland’s weather.
  • Not drying the surface: Applying sealant to a wet seam results in poor bonding and immediate leaks.
  • Overtightening screws: This can warp gutters or crack vinyl, creating new gaps.
  • Ignoring slope issues: If the gutter doesn’t slope toward the downspout, water pools at the seam, stressing the repair.
  • Neglecting safety: Working without a stable ladder or in wet conditions risks falls and injuries.

Avoiding these pitfalls ensures a durable repair that withstands Auckland’s challenging climate.

Get Reliable Gutter Repairs in Auckland

Don’t let a leaking gutter seam compromise your Auckland home. My Homes Construct is your local expert for gutter repairs, installations, and maintenance. Our experienced team delivers durable, compliant solutions tailored to your property, from single-storey villas in Mount Eden to multi-level homes in St Heliers.

📞 Call us today: +64 22 315 8987
🌐 Visit: myhomesconstruct.co.nz

Trust us to keep your gutters leak-free and your home protected. Contact us for a free consultation and let us handle your gutter needs with professionalism and care.

FAQs About Fixing a Leaking Gutter Seam

How long does gutter sealant last in Auckland’s climate?
High-quality silicone-based sealants can last 5–10 years, depending on exposure to rain, UV, and salt air. Regular inspections help catch issues early.

Can I fix a leaking seam without removing the old sealant?
No, old sealant prevents proper adhesion, leading to future leaks. Always remove it for a lasting, watertight repair.

What if my gutter seam keeps leaking after repair?
Check for proper drying, alignment, or underlying damage like rust. If the issue persists, contact My Homes Construct to assess the system.

Is DIY gutter repair safe for Auckland homeowners?
Yes, for single-storey homes, if you follow safety protocols like using a stable ladder. For higher roofs, professional help is safer.

How often should I inspect my gutters in Auckland?
Twice a year—before winter and after summer—to catch issues early, given Auckland’s wet and salty conditions.

Can I use any sealant for gutter repairs?
No, use a sealant rated for outdoor use, flexibility, and UV resistance, specifically designed for NZ’s weather.

Are gutter guards worth installing?
Yes, they reduce debris buildup, which can stress seams and cause leaks, especially in leafy Auckland suburbs.

What’s the best time of year to fix a gutter seam?
Late spring or early summer, when it’s drier, ensures better sealant curing and safer working conditions.

Conclusion

Fixing a leaking gutter seam is a practical DIY project that can save Auckland homeowners from costly water damage. This detailed guide equips you with the knowledge and steps to repair minor leaks, protect your property, and extend the life of your gutter system. Regular maintenance, high-quality materials, and proactive prevention are key to avoiding future issues. However, for larger problems, multi-storey homes, or tricky rooflines, professional help ensures safety and compliance with NZ standards.

My Homes Construct is here to support you with expert gutter repairs across Auckland. Call us at +64 22 315 8987 or visit myhomesconstruct.co.nz to schedule a consultation. Keep your home dry and secure with a leak-free gutter system—whether you tackle it yourself or let us handle the job!