How to Fix a Dented Gutter Downspout

A dented gutter downspout might seem like a small issue, but for Auckland homeowners, it can lead to serious drainage problems if left unchecked. Downspouts are crucial for directing rainwater away from your home, protecting your foundation, walls, and landscaping from water damage. In a city like Auckland, where heavy rainfall and storms are common, even a minor dent can cause pooling, overflow, or leaks, potentially leading to costly repairs. Common causes of downspout dents include lawnmowers bumping into them, vehicles parked too close, or harsh weather like hail or falling branches—scenarios all too familiar in suburbs like Titirangi or the North Shore. While fixing a dented downspout can often be a manageable DIY task, there are times when professional help is the smarter choice. In this comprehensive guide, we’ll walk you through the step-by-step process to fix a dented gutter downspout, share pro tips to prevent future damage, and highlight when it’s best to call in the experts. For those tougher jobs, My Homes Construct, Auckland’s trusted gutter pros, is here to ensure your home stays protected.

how to fix dented gutter downspout in Auckland NZ

Why a Dented Downspout Is a Problem for Your Auckland Home

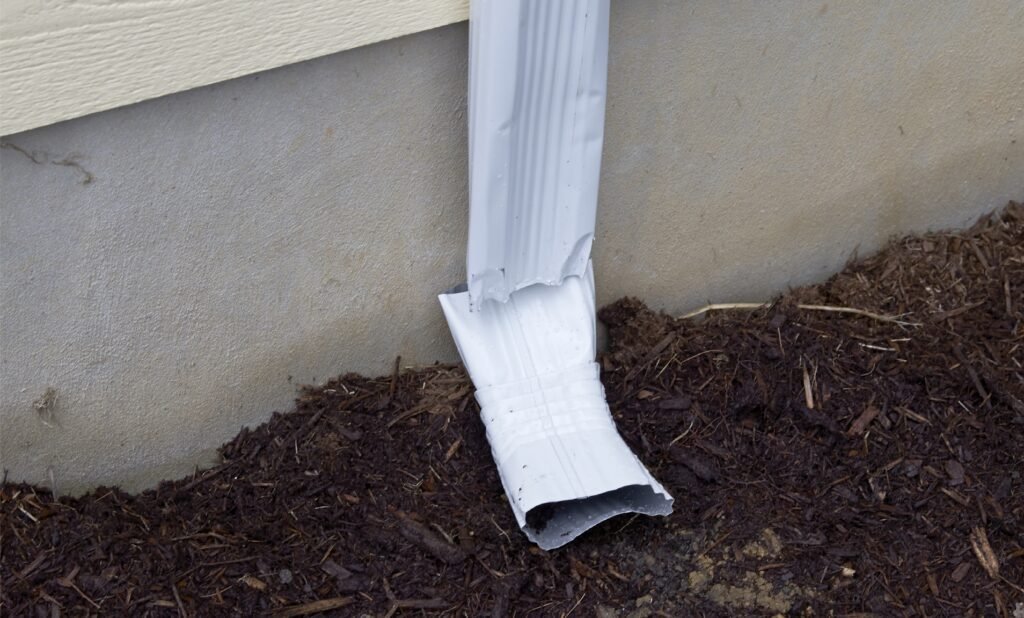
Before diving into the repair process, let’s explore why a dented downspout is more than just a cosmetic issue, especially in Auckland’s wet and windy climate. Here’s what can happen if you ignore the damage:

  • Disrupted water flow: A dent restricts the downspout’s ability to channel rainwater efficiently, causing water to pool in the gutter or overflow onto your home’s exterior. This can lead to leaks, damaged cladding, or even interior water damage, a common issue in older homes in areas like Grey Lynn.
  • Foundation damage: If water isn’t directed away from your home, it can seep into the ground near your foundation, causing cracks or erosion over time. In Auckland’s clay-heavy soils, particularly in suburbs like Albany, this risk is heightened as the soil expands and contracts with moisture.
  • Landscaping issues: Overflowing water can erode garden beds, wash away mulch, or flood lawns, ruining your landscaping efforts. This is a frequent concern in leafy areas like Epsom, where homes often have extensive gardens.
  • Pest and mould problems: Pooling water creates a breeding ground for pests like mosquitoes, which thrive in Auckland’s humid summers. It can also lead to dampness and mould growth in your walls or roofline, posing health risks, especially in heritage homes in Parnell.
  • Structural concerns: Over time, unchecked water damage can weaken your home’s structure, leading to costly repairs. In Auckland, where homes must comply with NZ Building Code Clause E2 (External Moisture) for proper rainwater management, a dented downspout can put you at risk of non-compliance.
  • Aesthetic damage: A dented downspout can detract from your home’s curb appeal, which is particularly important in Auckland’s competitive housing market. A well-maintained exterior, including functional gutters, can boost your property’s value.

Addressing a dented downspout promptly can prevent these issues, saving you time, money, and stress. Whether you choose to fix it yourself or call a professional, taking action is key to protecting your Auckland home.

Tools & Materials Needed

Fixing a dented gutter downspout requires a few basic tools and materials to ensure a safe and effective repair. Gathering these items beforehand will make the process smoother and more efficient. Here’s what you’ll need:

  • Rubber mallet or wooden block: A rubber mallet is ideal for gently reshaping metal downspouts without causing further damage. A wooden block can be used to distribute pressure evenly, preventing new dents.
  • Heat gun or boiling water (for reshaping plastic): If your downspout is made of vinyl or PVC—common in modern Auckland homes—a heat gun or boiling water can soften the material for reshaping.
  • Adjustable wrench or pliers: These tools help loosen brackets or screws to remove the downspout, and pliers can assist in reshaping stubborn dents.
  • Replacement parts (if needed): If the dent is too severe, you may need a replacement downspout section or elbow. Keep the dimensions of your current downspout handy (typically 75mm x 50mm for rectangular downspouts in NZ).
  • Work gloves and safety goggles: Protect your hands from sharp edges and your eyes from debris, such as rust flakes or dirt, while working on the downspout.
  • Ladder with stabilisers: A sturdy ladder is essential for safely accessing the downspout, especially for two-storey homes in areas like Remuera. Stabilisers prevent the ladder from damaging the gutter.
  • Gutter sealant or silicone caulk: To seal joints after reattaching the downspout, ensuring a watertight connection.
  • Cleaning cloth and wire brush: To clean the dented area, removing rust, dirt, or debris for a better repair.
  • Garden hose: To test water flow after the repair, confirming the downspout directs water properly.
  • Rust-proofing spray (optional): For metal downspouts, a rust-proofing spray can prevent corrosion, especially in Auckland’s salty coastal air.
  • Measuring tape and marker: To measure and mark the dented area, ensuring accurate reshaping.

Safety Tip: Ensure all tools are in good condition, and double-check that your ladder is rated for your weight and the height you’ll be working at. Auckland’s often-wet conditions can make ladders slippery, so take extra care.

With these tools and materials ready, you’ll be well-prepared to tackle the repair with confidence, ensuring your downspout is restored to full functionality.

Step-by-Step Guide to Fix a Dented Downspout

Follow this detailed step-by-step guide to fix a dented gutter downspout, designed with Auckland homeowners in mind. This process covers both metal and plastic downspouts, with safety and practicality at the forefront.

1. Assess the Damage

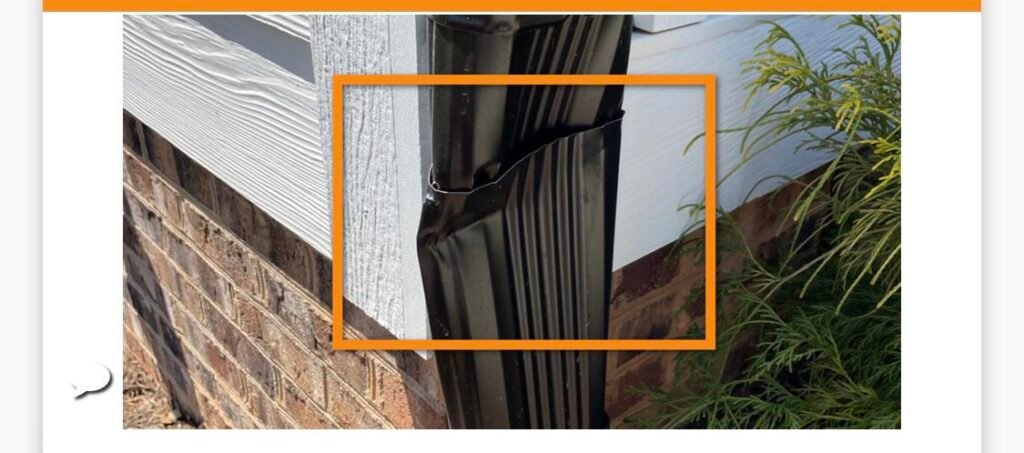
Before starting the repair, take a close look at the downspout to understand the extent of the damage and plan your approach.

  • Inspect the dent’s size and depth—shallow dents (under 2 cm) are easier to fix, while deeper ones may require replacement.
  • Check for cracks, splits, or holes around the dented area, which will need sealing or may indicate the need for a new section.
  • Look for signs of rust or corrosion on metal downspouts, especially in coastal areas like St Heliers, where salty air accelerates wear.
  • For plastic downspouts, check for brittleness or discoloration, which can indicate UV damage from Auckland’s intense summer sun.
  • Test water flow by running a garden hose through the gutter—if water backs up or overflows at the dent, the repair is urgent.
  • Determine the downspout’s material (aluminium, galvanised steel, or vinyl/PVC), as this will affect your repair method.

A thorough assessment helps you decide whether to repair or replace the downspout, ensuring you address all issues to prevent future drainage problems.

2. Remove the Downspout (if Needed)

For larger dents or to work more comfortably, you may need to remove the downspout. This step is optional for minor dents that can be fixed in place.

  • Set up your ladder on stable, flat ground, ensuring it extends at least 1 metre above the gutter for safe access. Use stabilisers to avoid damaging the gutter.
  • Wear gloves and safety goggles to protect yourself from sharp edges or debris.
  • Use an adjustable wrench or pliers to loosen screws or brackets holding the downspout to the gutter or wall. In Auckland, downspouts are often secured with galvanised brackets every 1–2 metres.
  • Gently pull the downspout away from the gutter outlet or elbow, taking care not to bend other sections.
  • If the downspout is in multiple sections, disconnect the damaged section by loosening the connecting clips or screws.
  • Lay the downspout on a flat surface, like your driveway, to make reshaping easier.

Safety Warning: Avoid working in wet or windy conditions, as Auckland’s weather can make ladders slippery and dangerous. Never overreach—reposition the ladder as needed.

Removing the downspout gives you better access to the dent, making the repair process more manageable, especially for larger or deeper dents.

3. Use a Mallet or Block to Reshape the Metal

If your downspout is metal (aluminium or galvanised steel), a rubber mallet and wooden block can help reshape the dent without causing further damage.

  • Clean the dented area with a wire brush and cloth to remove rust, dirt, or debris, ensuring a smooth surface for repair.
  • Place the wooden block inside the downspout, aligning it with the dent to distribute pressure evenly.
  • Gently tap the dented area with the rubber mallet from the outside, working slowly to reshape the metal back to its original form.
  • Check your progress frequently by stepping back and observing the downspout’s shape—avoid overcorrecting, which could create new dents.
  • For stubborn dents, tap from both sides, adjusting the block’s position to apply pressure from different angles.
  • If the dent is near a seam, work carefully to avoid loosening the seam, which could lead to leaks.

This method is effective for metal downspouts, restoring their shape and ensuring proper water flow without compromising structural integrity.

4. Apply Heat if It’s a Vinyl Downspout

For vinyl or PVC downspouts, heat is the best way to soften the material for reshaping, as these plastics are more flexible when warm.

  • Clean the dented area with a cloth to remove dirt or debris, ensuring a smooth surface.
  • If using a heat gun, set it to a low setting (around 120°C) and hold it 10–15 cm away from the dent, moving it in circular motions to heat the area evenly. Heat for 1–2 minutes until the plastic feels pliable.
  • Alternatively, pour boiling water over the dented area for 1–2 minutes to soften the vinyl—wear gloves to avoid burns, as hot water can splash.
  • Once the plastic is soft, use your hands (with gloves) or pliers to gently push the dent out, reshaping the downspout to its original form.
  • Let the downspout cool completely (about 10 minutes) to ensure the plastic hardens in its new shape.
  • Check for cracks or warping—if the plastic has become brittle, it may need replacing, as UV damage can weaken vinyl over time in Auckland’s climate.

Caution: Avoid overheating the plastic, as this can cause warping or melting, making the downspout unusable. Work in a well-ventilated area to avoid inhaling fumes.

Heat reshaping is a simple and effective way to fix vinyl downspouts, ensuring they regain their shape and functionality.

5. Reattach and Seal Joints

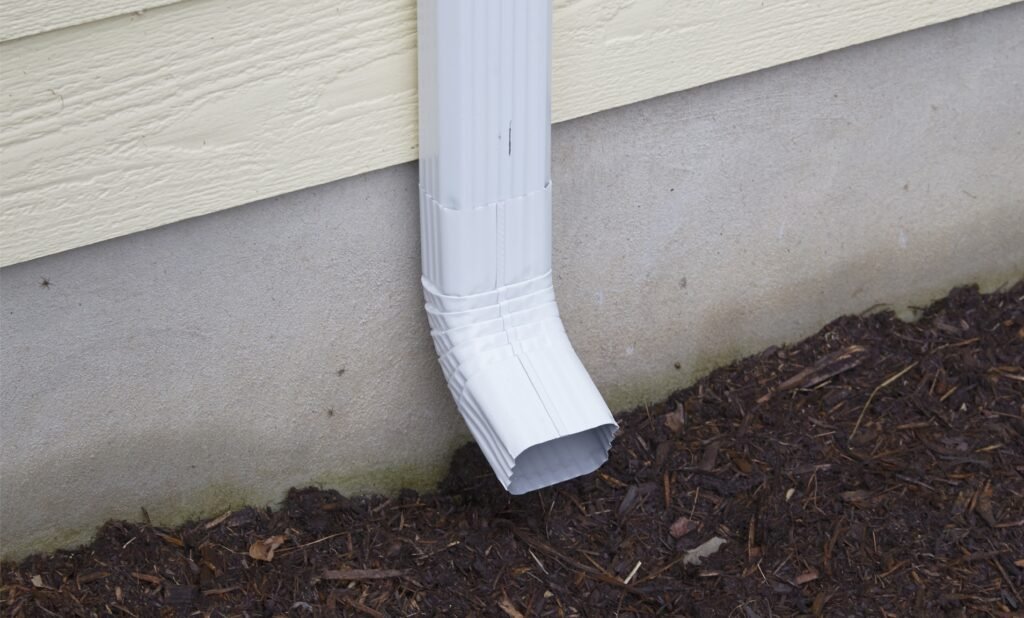
Once the dent is fixed, reattach the downspout and seal any joints to ensure a watertight connection.

  • Reattach the downspout to the gutter outlet or elbow, securing it with the original brackets or screws using an adjustable wrench.
  • If you disconnected multiple sections, reconnect them, ensuring a snug fit to prevent leaks.
  • Apply a bead of gutter sealant or silicone caulk to the joints, using a caulk gun for precision. Focus on areas where the downspout connects to the gutter or other sections.
  • Smooth the sealant with a gloved finger or caulk tool for a neat, watertight finish.
  • Let the sealant cure for 24 hours—or longer in humid Auckland weather—to ensure it sets properly.
  • For metal downspouts, apply a rust-proofing spray to the repaired area to prevent corrosion, especially in Auckland’s salty air.

Eco Tip: Use a low-VOC sealant to minimise environmental impact, a choice that aligns with Auckland’s focus on sustainability.

Sealing the joints ensures the downspout remains watertight, preventing leaks that could lead to further damage.

6. Test for Proper Flow

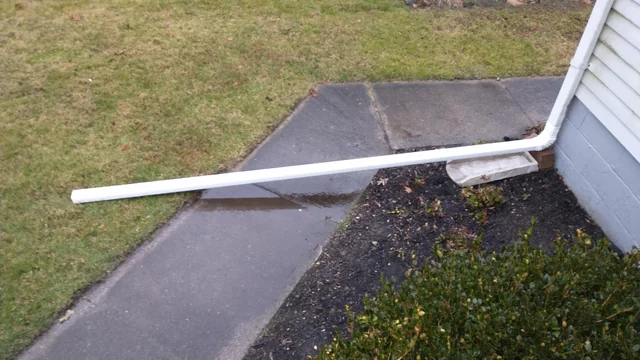
Testing the downspout after repair is crucial to confirm it directs water away from your home effectively.

  • Run water through the gutter using a garden hose, starting at the highest point and letting it flow through the downspout.
  • Observe the repaired area for leaks, pooling, or overflow, which could indicate the dent wasn’t fully corrected or the joints aren’t sealed properly.
  • Check the downspout’s outlet to ensure water flows freely into the drain or away from your home’s foundation.
  • If water backs up, use the mallet or heat method to make minor adjustments, then retest until the flow is smooth.
  • Inspect the area around your home’s foundation, walls, and landscaping to ensure no water is spilling over, which could lead to erosion or damage.
  • If issues persist after adjustments, consider replacing the downspout, as persistent drainage problems may indicate deeper damage.

Testing confirms your repair is successful, protecting your Auckland home from water damage during the city’s frequent rains.

Pro Tips to Avoid Future Dents

Preventing future dents in your downspout can save you time and money, keeping your gutter system in top shape. Here are expert tips tailored for Auckland homeowners:

  • Install protective guards or cages: Downspout guards or cages—available at most hardware stores in Auckland—can shield the pipe from impacts like lawnmowers or stray balls. This is especially useful in family-friendly suburbs like Howick, where kids’ activities often lead to accidental bumps.
  • Avoid placing bins or cars too close: Keep wheelie bins, cars, or other heavy objects at least 30 cm away from downspouts to prevent accidental damage. In tight driveways, common in Mount Eden, this simple step can make a big difference.
  • Regularly inspect for damage during gutter cleaning: Schedule gutter cleanings twice a year—before winter and after summer—and check your downspouts for dents or rust while you’re at it. This is particularly important in storm-prone areas like the North Shore.
  • Trim overhanging branches: Auckland’s windy weather can cause branches to fall, denting downspouts. Trim trees near your roof, especially in leafy suburbs like Titirangi, to reduce this risk.
  • Use durable materials for replacements: If replacing a section, opt for high-grade aluminium or Colorsteel downspouts, which are more resistant to dents than cheaper alternatives, and better suited for Auckland’s climate.
  • Install a downspout extension: Adding an extension to direct water further from your home reduces the risk of soil erosion near the downspout, which can weaken its base and make it more prone to damage.
  • Apply rust-proofing spray annually: For metal downspouts, an annual rust-proofing spray prevents corrosion, which weakens the material and makes it more prone to denting in Auckland’s humid and salty air.
  • Secure downspouts properly: Ensure downspouts are firmly attached with brackets every 1–2 metres to prevent them from swaying in strong winds, a common issue during Auckland’s stormy seasons.
  • Consider landscaping adjustments: If your downspout is near a high-traffic area, like a walkway or garden bed, adjust your landscaping to create a buffer zone, reducing the risk of accidental impacts.

Maintenance Tip: After major storms, check your downspouts for dents or debris blockages to catch issues early, especially given Auckland’s unpredictable weather patterns.

These tips will help keep your downspouts dent-free, ensuring your gutter system functions effectively year-round.

When to Replace Instead of Repair

While many dents can be fixed with a DIY approach, some situations call for replacing the downspout entirely. Here’s when replacement is the better option:

  • Cracked or rusted metal: If the dent has caused cracks or the downspout shows significant rust—common in older homes in Ponsonby—the structural integrity may be compromised. Rust can spread, leading to leaks or collapse, making replacement the safer choice.
  • Severe crushing or collapsed section: If the downspout is severely crushed or collapsed, reshaping may not restore its functionality. A collapsed section can restrict water flow, causing backups, especially during Auckland’s heavy rains.
  • Persistent drainage issues: If water continues to pool or overflow after your repair, the downspout may have internal damage or blockages that can’t be fixed. Persistent issues can lead to foundation damage, a serious concern in Auckland’s clay soils.
  • Brittle or UV-damaged plastic: For vinyl downspouts, if the material is brittle, cracked, or discoloured from UV exposure—a common issue in Auckland’s sunny summers—it may not hold up after reshaping, requiring replacement.
  • Age of the system: If your gutter system is over 20 years old, the downspout may be nearing the end of its lifespan. Replacing it with a modern, durable material like Colorsteel can prevent future issues.
  • Multiple dents or damage points: If the downspout has multiple dents or other damage, such as loose seams or missing brackets, the cost and effort of repairs may outweigh the benefits of a full replacement.

Cost Consideration: DIY repairs typically cost $20–$50 for tools and materials, while a replacement downspout section costs $50–$100. Professional replacement in Auckland can range from $150–$500, depending on access and complexity, but ensures compliance with NZ Building Code Clause E2.

If replacement is needed, My Homes Construct can provide expert installation, ensuring your new downspout is durable, compliant, and properly installed.

Get Professional Gutter Help in Auckland

Don’t let a dented downspout put your Auckland home at risk of water damage. My Homes Construct is your local expert for gutter repairs, from minor dents to full replacements. Our experienced team ensures your gutter system is safe, functional, and ready to handle Auckland’s wet weather, whether you’re in a villa in Ponsonby or a modern home in the North Shore.

📞 Call the My Homes Gutter Experts: 022 315 8987
📧 Email: info@myhomesconstruct.co.nz
🌐 Website: https://myhomesconstruct.co.nz

Contact us today for a free consultation and let us keep your home protected!

FAQs About Fixing a Dented Gutter Downspout

Can I fix a dented downspout without removing it?
Yes, for minor dents, you can reshape the downspout in place using a rubber mallet for metal or a heat gun for plastic. However, removing it gives you better access and reduces the risk of damaging other sections.

How do I know if I should replace the downspout entirely?
Replace the downspout if it’s cracked, rusted, severely crushed, or has persistent drainage issues after repair. Brittle or UV-damaged plastic downspouts may also need replacing, as they’re prone to further damage.

Is it better to repair metal or plastic downspouts?
Metal downspouts (like aluminium) are often easier to repair, as they can be reshaped without breaking. Plastic downspouts can be trickier—if they’re brittle or cracked, replacement is usually better, as heat reshaping may not last.

How often should I inspect my downspouts in Auckland?
Inspect your downspouts twice a year—before winter and after summer—along with your regular gutter cleanings. Check for dents, rust, or blockages, especially after storms, given Auckland’s wet climate.

Can a dented downspout cause foundation damage?
Yes, a dented downspout can disrupt water flow, causing overflow that seeps into the ground near your foundation. In Auckland’s clay soils, this can lead to foundation cracks or erosion over time.

Conclusion

Fixing a dented gutter downspout is a manageable DIY task that can save your Auckland home from serious drainage issues, especially when tackled early. By following this step-by-step guide—assessing the damage, reshaping the dent, sealing joints, and testing the flow—you can restore your downspout’s functionality and protect your property from water damage. Regular maintenance, like installing protective guards and keeping objects clear of the downspout, can prevent future dents, ensuring your gutter system stays in top shape through Auckland’s rainy seasons. However, if the damage is severe, involves cracks, rust, or persistent drainage problems, or if you’re dealing with a hard-to-reach area, it’s best to call in the professionals. My Homes Construct offers fast, affordable gutter solutions for Auckland homeowners, from minor repairs to full replacements. Contact us at 022 315 8987, email info@myhomesconstruct.co.nz, or visit https://myhomesconstruct.co.nz for expert help. Let us keep your home safe and dry, no matter the weather!