How to Install a Gutter Apron
Gutters are vital for protecting your Auckland home from water damage, but without the right setup, rainwater can still wreak havoc.
A gutter apron—also known as gutter flashing—is a key component that ensures water flows directly into your gutter system, safeguarding your roofline, fascia, and foundation.
In Auckland, where annual rainfall averages around 1200 mm, missing or poorly installed gutter aprons can lead to serious issues like fascia rot, leaky roofs, or even foundation damage, especially in areas with clay soils like Albany.
These problems are costly to fix and can lower your property’s value in Auckland’s competitive housing market. Installing a gutter apron is a manageable DIY project for those comfortable working at height, but it requires precision to prevent leaks.
If you’re unsure or dealing with a steep roof, professional help might be the safer option. In this guide, we’ll explain what a gutter apron is, walk you through the installation process step by step, and share pro tips for a leak-free finish.
We’ll also highlight why My Homes Construct Ltd is Auckland’s trusted expert for gutter repairs and installations when you need a professional touch.
Tools & Materials Needed
Before you begin installing a gutter apron, gather the right tools and materials to ensure a smooth and safe process. Here’s what you’ll need for a typical Auckland home, considering local conditions and building standards:
- Gutter apron flashing:
- Purchase a gutter apron made of corrosion-resistant material like aluminium or galvanised steel to withstand Auckland’s humid, salty air, especially in coastal suburbs like the North Shore.
- Measure the length of your gutter run to determine how much flashing you’ll need—aprons typically come in 2m lengths, so a 10m gutter run requires 5 pieces, with slight overlaps at joints.
- Ensure the apron’s width fits your gutter system—most are 100–150 mm wide, with a 50 mm lip that sits over the gutter, a standard size for homes in Papatoetoe.
- Roofing nails or screws:
- Galvanised roofing nails (25–30 mm long) or stainless steel screws (25 mm long) to secure the gutter apron to the roof decking, preventing rust in Auckland’s wet climate. You’ll need about 5–7 nails per 2m section of apron.
- Nails are faster to install, while screws offer a stronger hold and are easier to remove if adjustments are needed, a practical choice for steep roofs in Titirangi.
- Tin snips, hammer, measuring tape:
- Tin snips to cut the gutter apron to size, ensuring a precise fit along your roof edge, especially if working around corners or downpipes in Mount Eden homes.
- A hammer to drive roofing nails into the roof decking, securing the apron firmly in place, or a cordless drill if using screws for a faster installation.
- A measuring tape and pencil to mark cutting lines and nail positions on the apron, ensuring even placement and a professional finish.
- Ladder and safety gear:
- A sturdy, extendable ladder with stabilisers, rated for your weight, to safely reach the roof edge. Essential for two-storey homes in Remuera, where rooflines can be high.
- Safety gear includes gloves to protect your hands from sharp metal edges, safety goggles to shield your eyes from debris, and non-slip shoes to prevent falls, especially in Auckland’s often-wet conditions.
- A harness or ladder anchor if working on a steep roof, ensuring compliance with WorkSafe NZ guidelines for working at height.
- Additional tools and materials:
- Pry bar or flathead screwdriver: To lift shingles along the roof edge, making it easier to slide the gutter apron underneath without damaging the shingles.
- Roofing cement or silicone sealant: To seal joints and overlaps, ensuring a watertight finish that can withstand Auckland’s heavy rainfall.
- Cleaning brush or cloth: To clear debris from the roof edge and gutter, ensuring a clean surface for the apron installation.
- Gloves and knee pads (optional): For added comfort while working on the roof, especially on steep pitches common in the Waitakere Ranges.
Safety Tip: Always check the weather before starting—Auckland’s sudden rain showers can make roofs slippery, increasing the risk of falls. Schedule the project for a dry day, ideally in summer (December–February).
With these tools and materials ready, you’ll be well-prepared to install a gutter apron that protects your Auckland home from water damage, ensuring a professional-quality result.
Step-by-Step Guide: How to Install a Gutter Apron
Installing a gutter apron is a straightforward DIY project if you follow these steps carefully. This guide is tailored for Auckland homeowners, considering local weather and building standards. Always prioritise safety when working at height, especially on ladders or roofs.
1. Remove Shingles Along the Roof Edge
Lifting the shingles allows you to slide the gutter apron underneath, ensuring a secure fit that directs water into the gutter.
- Set up your ladder safely on flat ground, ensuring it extends at least 1 metre above the roof edge for safe access. Wear safety gloves, goggles, and non-slip shoes to protect yourself while working at height.
- Use a pry bar or flathead screwdriver to gently lift the first row of shingles along the roof edge, starting at one end of the gutter run. Work carefully to avoid cracking or tearing the shingles, especially on older roofs in Ponsonby.
- Lift the shingles just enough to expose the roof decking underneath—typically 5–10 cm is sufficient to slide the gutter apron into place. If the shingles are brittle or damaged, consider replacing them to prevent leaks.
- Clear any debris, such as leaves or dirt, from the exposed roof edge using a brush or cloth, ensuring a clean surface for the apron to sit flush against the decking.
- If the existing felt underlay is damaged, replace it with new roofing felt to maintain water resistance, ensuring compliance with NZ Building Code Clause E2 (External Moisture).
Shingle Tip: If shingles are stuck down with old adhesive, apply gentle heat with a hairdryer to loosen them, making removal easier without causing damage.
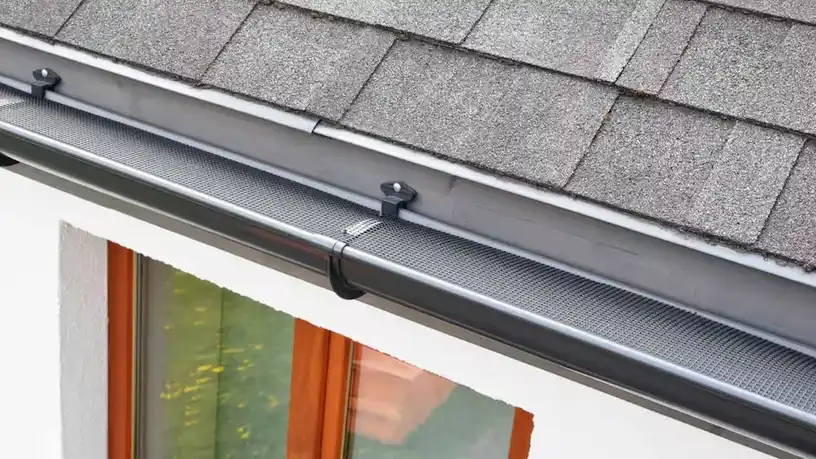
2. Slide Gutter Apron Under the First Row
Positioning the gutter apron correctly ensures water flows into the gutter without seeping behind it, protecting your fascia and roofline.
- Take a section of gutter apron and slide the flat edge (the part that sits on the roof) under the lifted shingles, starting at one end of the gutter run. The angled lip should hang over the gutter, not the fascia.
- Ensure the apron sits flat against the roof decking, with no gaps between the metal and the roof surface, as gaps can allow water to seep through, a concern during Auckland’s heavy rainfall.
- If working with multiple sections of apron (e.g., for a 10m gutter run), overlap each section by 5–10 cm to prevent water from leaking through the joints, a key step for homes in St Heliers where coastal storms are frequent.
- Press the apron firmly into place, ensuring the shingles sit back down over the flat edge, securing it in position and creating a seamless transition from roof to gutter.
- Check that the apron’s lip extends over the gutter by about 2–3 cm, ensuring water will drip directly into the gutter rather than running behind it, protecting the fascia board.
Fitment Tip: If the apron doesn’t sit flush, check for obstructions like nails or debris under the shingles, and remove them to ensure a tight, leak-free fit.
3. Align the Apron Edge Over Gutter
Proper alignment ensures the gutter apron directs water into the gutter system, preventing overflow and damage to your home’s structure.
- Adjust the gutter apron so the angled lip hangs directly over the gutter, not the fascia. The lip should extend 2–3 cm into the gutter to catch all runoff, even during heavy downpours common in Auckland’s winters.
- Use a measuring tape to ensure the apron is positioned evenly along the entire gutter run, maintaining a consistent overhang to create a uniform appearance and effective water flow.
- If the gutter apron is too long, mark the excess with a pencil and cut it to size using tin snips, ensuring a precise fit around corners or downpipes, a common need in Mount Eden homes with complex rooflines.
- For corners or joins, cut the apron at a 45-degree angle to create a neat overlap, ensuring water can’t seep through gaps, especially important in high-wind areas like the Waitakere Ranges.
- Double-check the alignment by running your hand along the apron’s edge—it should feel smooth and even, with no sections protruding or dipping, ensuring efficient water drainage.
Alignment Tip: Use a piece of string or a straight edge to check the apron’s alignment along the gutter, ensuring it remains consistent and functional across the entire roof edge.
4. Nail or Screw into Roof Decking
Securing the gutter apron to the roof decking ensures it stays in place, even during Auckland’s stormy weather, preventing water from seeping underneath.
- Mark 5–7 evenly spaced points along the flat edge of the gutter apron, about 2 cm from the roof edge, using a pencil. For a 2m section, space the nails or screws roughly 30–40 cm apart.
- If using roofing nails, hammer them through the apron into the roof decking at each marked point, ensuring they penetrate at least 20 mm into the timber to provide a secure hold, per NZS 3604 (Timber Framed Buildings).
- If using screws, pre-drill small pilot holes (3 mm) at each marked point, then drive galvanised screws into the decking using a cordless drill, tightening until secure but not overtightening, which can bend the metal.
- Ensure the nails or screws are galvanised or stainless steel to prevent rust in Auckland’s humid, salty air, particularly in coastal areas like the North Shore.
- After securing, press down on the apron to confirm it’s firmly in place with no movement, ensuring it can withstand wind and rain without lifting or shifting.
Securing Tip: If the roof decking feels soft or rotten, replace the damaged section before installing the apron, as weak timber can compromise the apron’s hold and lead to leaks.
5. Re-lay Shingles and Seal Joints
Finishing the installation properly ensures the gutter apron is watertight and blends seamlessly with your roof, providing long-lasting protection.
- Gently lower the lifted shingles back over the flat edge of the gutter apron, ensuring they sit flush and cover the nails or screws completely, restoring the roof’s water resistance.
- If the shingles don’t sit flat, apply a small amount of roofing adhesive under them to secure them to the apron, preventing wind from lifting them during Auckland’s gusty conditions.
- Apply a thin bead of roofing cement or silicone sealant along the joints where apron sections overlap, ensuring no water can seep through, a critical step for homes in Remuera where heavy rain can exploit small gaps.
- Seal the top edge of the shingles where they meet the apron with a thin layer of roofing cement, creating an extra barrier against water infiltration, especially important in Auckland’s wet climate.
- Run a garden hose along the roof edge to test the installation—water should flow directly into the gutter with no leaks or overflow, confirming a successful, leak-free setup.
Finishing Tip: Wait 24–48 hours for the sealant to cure fully before testing with heavy water flow, as Auckland’s humidity can slow drying times, ensuring a strong, watertight bond.
By following these steps, you’ll install a gutter apron that effectively directs water into your gutter system, protecting your Auckland home from costly water damage.
Pro Tips for a Leak-Free Finish
A well-installed gutter apron can save your home from water damage, but a few expert tips can ensure a professional, leak-free result. Here’s how to get it right in Auckland’s challenging conditions:
- Ensure tight fit along fascia:
- The gutter apron’s lip should sit snugly over the gutter, with no gaps between the apron and the gutter’s outer edge. Even a 2 mm gap can let water run behind the gutter, causing fascia rot, a common issue in Ponsonby’s older homes.
- Press the apron firmly against the gutter while securing it, ensuring a tight fit that directs all runoff into the gutter system, especially during Auckland’s heavy downpours.
- If the gutter is slightly misaligned, adjust it before installing the apron to ensure a seamless connection, preventing water from dripping onto the fascia.
- Overlap apron sections to avoid gaps:
- When installing multiple sections of gutter apron, overlap each piece by 5–10 cm to prevent water from seeping through the joints, a key step for long gutter runs in Titirangi homes.
- Apply a bead of roofing cement or silicone sealant along the overlap to create a watertight seal, ensuring no leaks during Auckland’s frequent rain showers.
- Cut the ends of each section at a 45-degree angle for a smoother overlap, reducing the risk of water pooling or leaking at the joints, especially in high-wind areas like the Waitakere Ranges.
- Seal with roofing cement for added waterproofing:
- Use a high-quality roofing cement or silicone sealant to seal all joints, overlaps, and the top edge of the shingles where they meet the apron, creating an extra layer of protection against Auckland’s wet climate.
- Apply the sealant in a thin, even layer using a caulk gun for precision, ensuring it fills any small gaps without creating a messy finish that can attract dirt or debris.
- Check the sealant’s weather resistance—opt for a product rated for UV and moisture exposure, as Auckland’s strong sunlight and frequent rain can degrade low-quality sealants over time.
- Work safely at height:
- Always use a stable ladder and wear safety gear, including gloves, goggles, and non-slip shoes, to protect yourself while working on the roof, especially in Auckland’s often-wet conditions.
- Avoid working in windy or rainy weather, as Auckland’s sudden storms can make roofs slippery and increase the risk of falls, per WorkSafe NZ guidelines.
- Inspect the fascia and gutter condition:
- Before installing the apron, check the fascia for signs of rot or damage—if it’s compromised, replace it first, as a weak fascia can’t support the apron properly, leading to leaks.
- Ensure the gutter is securely fastened and free of debris, as a clogged or loose gutter can cause water to back up, undermining the apron’s effectiveness.
Pro Tip: After installation, inspect the gutter apron annually during your regular gutter maintenance to check for loose nails, cracked sealant, or corrosion, ensuring it continues to protect your home effectively.
These tips will help you achieve a leak-free gutter apron installation, ensuring your Auckland home stays dry and damage-free through all seasons.
FAQs About Installing a Gutter Apron
Can you install a gutter apron without removing shingles?
It’s possible but not recommended. Lifting the shingles ensures the apron sits flush against the roof decking, creating a proper seal. Without removing shingles, you risk gaps that can lead to leaks, especially in Auckland’s heavy rainfall.
Is a drip edge the same as a gutter apron?
No, a drip edge directs water away from the fascia but doesn’t overlap the gutter like a gutter apron does. A gutter apron ensures water flows directly into the gutter, making it more effective for gutter-specific protection in Auckland homes.
Do I need a gutter apron if I already have flashing?
If your existing flashing doesn’t direct water into the gutter, a gutter apron can provide added protection, especially if you’re noticing fascia damage or leaks. It’s a good upgrade for older homes in Mount Eden with outdated flashing.
How long does a gutter apron last in Auckland’s climate?
A galvanised steel or aluminium gutter apron can last 20–30 years if properly installed and maintained. Regular inspections and resealing joints every 5–7 years will extend its lifespan in Auckland’s humid, salty air.
What if my roof is too steep to work on safely?
Steep roofs, common in the Waitakere Ranges, can be dangerous for DIYers. Hire professionals like My Homes Construct Ltd to handle the installation safely, ensuring compliance with WorkSafe NZ safety standards.

Conclusion
Installing a gutter apron is a smart and practical way to protect your Auckland home from costly water damage, ensuring rainwater flows directly into your gutter system without harming your fascia, roofline, or foundation.
By following this step-by-step guide—removing shingles, sliding the apron into place, aligning it over the gutter, securing it to the roof decking, and sealing the joints—you can achieve a leak-free setup that stands up to Auckland’s wet climate.
Pro tips like ensuring a tight fit, overlapping sections, and sealing with roofing cement will help you get a professional-quality result, keeping your home dry through heavy rain and storms.
However, working at height or on steep roofs can be tricky, and mistakes can lead to leaks or safety risks. If you’re not confident about heights, roof work, or ensuring compliance with local regulations, it’s best to call in the experts.
My Homes Construct Ltd specializes in gutter repairs and installations, offering Auckland homeowners peace of mind with top-notch craftsmanship.
📞 Contact the Experts From minor dents to full replacements—we’re Auckland’s gutter pros!
📞 Call My Homes Construct Ltd : 022 315 8987
📧 Email : info@myhomesconstruct.co.nz Don’t let water damage threaten your home— call us today for a free consultation and keep your gutters in top shape!
Frequently Asked Questions
What is a Gutter Apron?
A gutter apron might sound like a small detail, but it plays a big role in keeping your Auckland home dry and damage-free. Let’s break down what it is, how it differs from similar components, and when you might need one. Definition and role (directs water into gutter, protects fascia) : A gutter apron is a strip of metal flashing, typically L-shaped, installed along the edge of your roof where it meets the gutter. It directs rainwater from the roof straight into the gutter, preventing it from running behind and causing damage. Its main job is to protect the fascia board—the timber or metal str
Gutter Help Across Auckland
If this guide raised a question about your own home, the My Homes Construct Ltd team is here to help. We provide professional gutter cleaning, repair and replacement services right across Auckland — North Shore, West Auckland, Central Auckland, East Auckland and South Auckland — along with the surrounding suburbs.
Every enquiry starts with free, no-obligation advice and a written quote. We're a registered building company and back our work with a workmanship warranty as per your quotation, so you can move forward with confidence.
When to Call a Professional
The trickiest part of any gutter cleaning, repair and replacement project is often knowing when to stop and call someone in. Warning signs worth taking seriously include recurring problems, damage that keeps spreading, anything involving safety or access at height, and work that touches the structure of your home.
In those situations a professional opinion pays for itself. We're always happy to take a look and tell you straight whether it's something you can manage yourself or a job better left to a registered building company — with no obligation either way.
Timing It Right in Auckland
Auckland's climate runs to its own calendar, and gutter cleaning, repair and replacement projects go more smoothly when they're scheduled with that in mind. Booking weather-dependent work for a settled stretch avoids delays, and getting preventative jobs done before winter saves you from reacting once the heavy rain and coastal winds arrive.
If you're not sure where your property sits on that timeline, that's exactly the kind of thing a free assessment answers. We'll tell you honestly whether something needs attention now or can sensibly wait until the season suits.
A Quick Checklist for Auckland Homeowners
Whatever you decide to do next, a few simple principles will save you money and stress on any gutter cleaning, repair and replacement job in Auckland. Act early — Auckland's wet, humid climate turns small problems into expensive ones faster than most people expect. Get it in writing — a clear, itemised written quote protects you and makes comparing options straightforward. Check it's a registered building company — it matters for quality, consent and warranty cover. Ask about the warranty — reputable Auckland tradespeople stand behind their workmanship, not just the materials. Think long-term value, not just the cheapest price — the lowest quote is rarely the best value once durability is factored in.
Keep these in mind and you'll avoid the most common — and most costly — mistakes we see on Auckland properties.
Need Professional Help in Auckland?
My Homes Construct Ltd provides expert gutter and full home-improvement services across all Auckland suburbs. Get a free, no-obligation quote today.