Leaky gutters can wreak havoc on Auckland homes, from water pooling near foundations to costly roof repairs. A gutter slip joint is a simple, effective solution to connect gutter sections, fix leaks, or accommodate thermal expansion. Whether you’re a confident DIYer or considering professional help, this comprehensive guide will walk you through installing a gutter slip joint with precision. For complex jobs or multi-story properties in Auckland, My Homes Construct offers expert gutter services to keep your home dry and secure.
Why Gutter Maintenance Matters in Auckland
Auckland’s unique climate—marked by heavy rainfall, high humidity, and occasional storms—puts gutters under constant strain. According to Auckland Council’s drainage guidelines, effective roof runoff control is essential to prevent water damage to properties and comply with local regulations. Poorly maintained gutters can lead to:
- Foundation damage: Overflowing water can erode soil around your home’s foundation, causing cracks or subsidence.
- Roof leaks: Blocked or leaky gutters can force water under roofing materials, damaging ceilings and insulation.
- Mould and rot: Excess moisture encourages mould growth and wood decay in eaves or fascias.
- Pest issues: Stagnant water in clogged gutters attracts mosquitoes and other pests.
Installing a slip joint correctly is a proactive step to protect your home. For DIYers, it’s a cost-effective way to address minor issues. However, for extensive damage or compliance with NZ Building Code Clause E2 (External Moisture), professional intervention ensures long-term reliability.
Tools & Materials Needed
Before starting, gather these tools and materials to ensure a smooth installation:
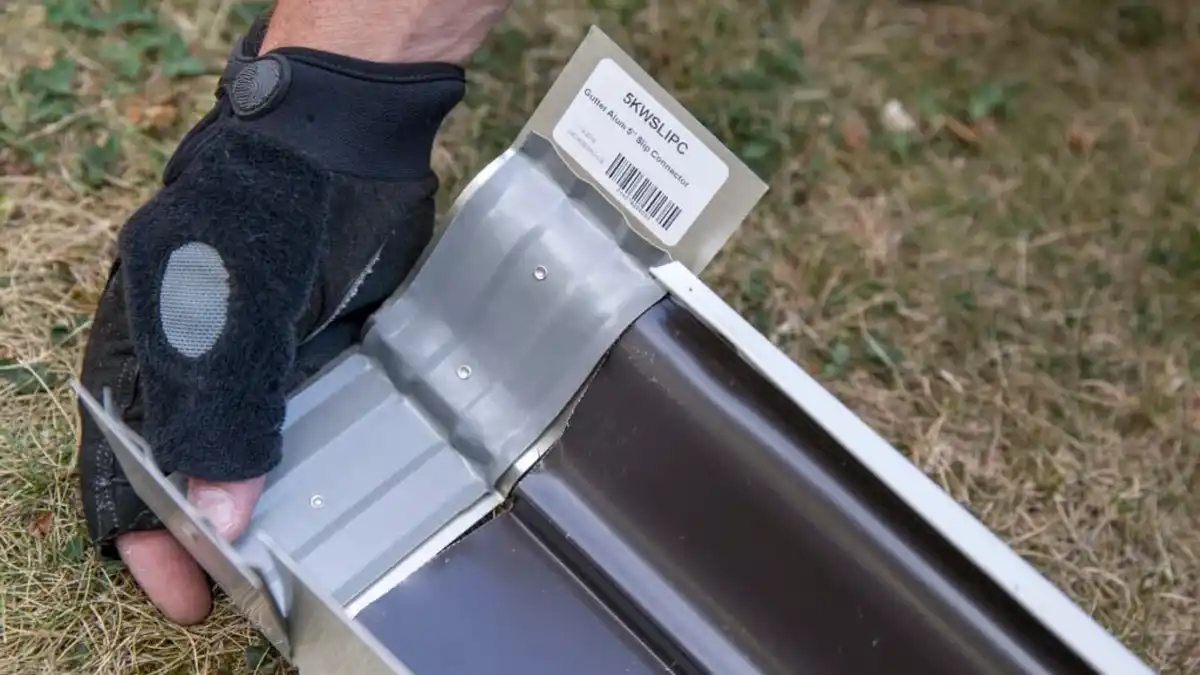
- Slip joint connector: Choose aluminium for metal gutters or vinyl/uPVC for plastic systems. Ensure it matches your gutter’s profile (e.g., half-round, box, or K-style).
- Waterproof sealant: Silicone-based sealants are ideal for durability and flexibility in Auckland’s wet climate.
- Stainless steel screws or clips: Opt for rust-resistant fasteners to withstand coastal corrosion.
- Cordless drill: With bits for drilling pilot holes and driving screws.
- Measuring tape and marker: For precise measurements and alignment.
- Ladder: Stable, rated for your roof height, and equipped with ladder stabilisers if possible.
- Cleaning tools: Gloves, a brush, or a trowel to remove debris from gutters.
- Safety gear: Non-slip shoes, work gloves, and eye protection to prevent injuries.
- Hose: For testing water flow after installation.
- Level: To check the gutter’s slope for proper runoff.
Pro Tip: Check your gutter material before buying a slip joint. Aluminium gutters require aluminium connectors, while vinyl or uPVC systems need matching plastic components. Mismatched materials can lead to poor fits or premature wear.
For Auckland homeowners, sourcing materials from local suppliers like Mitre 10 or Bunnings ensures availability and compliance with NZ standards. If you’re unsure about compatibility, My Homes Construct can assess your gutter system and recommend the right components.
Step-by-Step Installation Guide
Follow these detailed steps to install a gutter slip joint and restore your gutter system’s performance. Each step is designed for clarity, ensuring even novice DIYers can achieve professional results.
1. Clean & Prep the Gutter Ends
Start by clearing debris, dirt, or old sealant from the gutter ends where the slip joint will be installed. Leaves, sludge, and rust can prevent a tight seal, so thorough cleaning is essential.
- How to clean:
- Wear gloves to protect your hands from sharp edges.
- Use a trowel or brush to scoop out leaves, dirt, or sediment.
- Rinse the area with a hose to remove fine particles.
- Scrape off old sealant or caulk with a putty knife.
- Wipe the gutter ends with a damp cloth for a clean, dry surface.
Safety Callout: Position your ladder on firm, level ground. Use a ladder stabiliser or have a helper hold the base to prevent slips. Never lean beyond the ladder’s side rails.
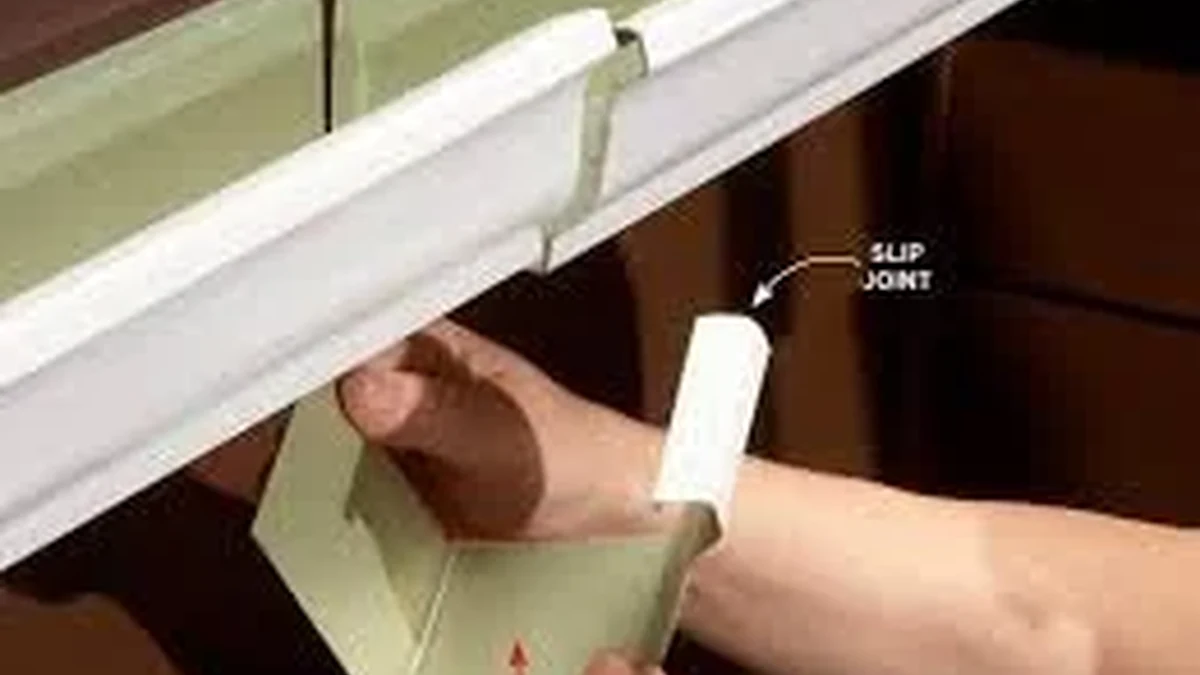
2. Measure and Align the Slip Joint
Measure the gap between the two gutter sections to ensure the slip joint fits properly. Most slip joints are designed to overlap each gutter end by at least 5–7 cm for stability.
- Steps:
- Use a measuring tape to confirm the slip joint’s length covers both gutter ends with sufficient overlap.
- Mark the gutter ends with a marker to guide placement.
- Check the gutter’s slope using a level. Gutters should slope slightly (1 cm per 3 metres) toward the downspout for efficient drainage.
Proper alignment prevents water pooling and ensures the slip joint functions as intended.
3. Apply Sealant to the Slip Joint Edges
Sealant is the key to a watertight connection. Use a high-quality silicone-based sealant rated for outdoor use and compatible with your gutter material.
- Application:
- Cut the sealant tube’s nozzle at a 45-degree angle for precise application.
- Apply a continuous, generous bead of sealant along the inner edges of the slip joint connector.
- Spread the sealant evenly with a gloved finger or a caulk smoothing tool for a uniform seal.
Tip: In Auckland’s humid climate, choose a sealant with anti-mould properties to prevent algae or mildew buildup.
4. Insert Slip Joint Between Gutter Sections
Carefully slide the slip joint over the ends of the two gutter sections, ensuring the sealant makes full contact.
- Steps:
- Align the slip joint with your marked points.
- Press firmly to seat the sealant and eliminate air gaps.
- Ensure the slip joint maintains the gutter’s slope and profile for smooth water flow.
- Wipe away excess sealant with a damp cloth for a clean finish.
If the fit feels loose, double-check the slip joint’s compatibility with your gutter system. A snug fit is critical for durability.
5. Secure with Screws or Clips
Fasten the slip joint to the gutters using rust-resistant screws or clips. Stainless steel fasteners are ideal for Auckland’s coastal air, which can corrode standard screws.
- Fastening:
- Drill pilot holes through the slip joint and gutter ends to prevent cracking (especially for vinyl gutters).
- Space screws or clips evenly, about 10 cm apart, along both sides of the slip joint.
- Drive screws with a cordless drill, stopping just as they’re flush to avoid overtightening.
- For clip-style connectors, snap them into place and check for a secure hold.
Warning: Overtightening screws can distort the gutter or crack plastic components, leading to leaks.
6. Test for Leaks with Water Flow
Test the installation by running water through the gutter system to confirm a leak-free joint.
- Testing:
- Use a hose to simulate rainfall, starting at the highest point of the gutter.
- Observe the slip joint for drips, pooling, or seepage.
- Check the downspout to ensure water flows freely without backups.
- If leaks appear, dry the area, reapply sealant, and re-secure the joint.
Testing ensures your slip joint can handle Auckland’s frequent downpours. For added peace of mind, schedule a follow-up check after the next rain.
Pro Tips for Success
These expert tips will elevate your DIY gutter slip joint installation and ensure long-lasting performance:
- Maintain proper slope: A slight downward tilt toward the downspout prevents water pooling and debris buildup.
- Don’t skimp on sealant: A thick, even layer is your best defence against leaks, especially in Auckland’s wet seasons.
- Match the gutter profile: Slip joints must fit your gutter’s shape (e.g., half-round, box, or K-style) for a secure connection.
- Inspect annually: Check joints for corrosion, cracks, or loosened screws, particularly after storms or high winds.
- Use quality materials: Invest in rust-resistant screws and UV-stable sealants to withstand Auckland’s coastal and UV exposure.
- Consider expansion: In long gutter runs, slip joints allow for thermal movement, preventing buckling in summer heat.
For visual learners, consider sketching a diagram of the slip joint placement or referring to online videos for clarity. My Homes Construct also offers consultations to guide DIYers on material selection and techniques.
Common Mistakes to Avoid
Even experienced DIYers can make errors during gutter slip joint installation. Avoid these pitfalls:
- Using the wrong sealant: Non-silicone or indoor sealants break down quickly outdoors.
- Skipping cleaning: Debris or old sealant prevents a tight seal, leading to leaks.
- Misaligning the slope: Flat or reversed slopes cause water to pool, stressing the joint.
- Overtightening fasteners: This can crack vinyl gutters or warp metal ones.
- Ignoring safety: Working at heights without proper ladder precautions risks serious injury.
If you encounter these issues or feel uncertain, professional help can save time and prevent costly repairs.
When to Call a Professional
While DIY slip joint installation is manageable for minor repairs, some situations demand expert intervention:
- Sagging or misaligned gutters: These require re-pitching or structural fixes to restore proper drainage.
- Extensive damage: Cracked, rusted, or corroded gutter sections may need partial or full replacement.
- Multi-story homes: High roofs pose significant safety risks and require specialised equipment like scaffolding or cherry pickers.
- Complex systems: Long gutter runs, multiple downspouts, or heritage homes often need custom solutions.
- Compliance concerns: Professional installations ensure adherence to NZ Building Code Clause E2 and Auckland Council drainage requirements.
Hiring a professional also guarantees warranties on materials and labour, offering long-term peace of mind. For Auckland homeowners, My Homes Construct provides tailored solutions backed by local expertise.
Get Expert Gutter Help in Auckland
Don’t let leaky gutters compromise your home’s safety or value. My Homes Construct is Auckland’s trusted name for gutter repairs, installations, and maintenance. Our experienced team delivers durable, compliant solutions tailored to your property’s needs, from single-story villas to multi-level apartments.
📞 Call us today: 022 315 8987
🌐 Visit: myhomesconstruct.co.nz
Whether you need a quick repair or a full gutter system overhaul, we’re here to keep your home dry and protected. Contact us for a free consultation and experience the difference of working with Auckland’s gutter experts.
Additional Resources for Auckland Homeowners
To support your gutter maintenance journey, consider these resources:
- Auckland Council Drainage Guidelines: Learn about local requirements for roof runoff and stormwater management.
- NZ Building Code Clause E2: Understand standards for external moisture control to ensure compliant repairs.
- Online tutorials: Platforms like YouTube offer visual guides on gutter repairs, though always verify techniques against NZ standards.
- My Homes Construct Blog: Visit our website for more tips on home maintenance and gutter care.
For personalised advice, contact My Homes Construct to discuss your gutter needs and explore tailored solutions.
Frequently Asked Questions
What is a Gutter Slip Joint?
A gutter slip joint is a connector designed to join two gutter sections, ensuring a seamless flow for rainwater. It’s a critical component in maintaining an efficient roof runoff system, especially in Auckland’s wet and variable climate. Slip joints serve several purposes: Expansion and contraction : They allow gutters to expand and contract with temperature changes, preventing cracks or warping. Leak repairs : They seal gaps or replace damaged joints to restore watertight performance. Seamless transitions : They connect long gutter runs or link gutters to downspouts for efficient drainage. Yo
Can you install a slip joint without sealant?
No, sealant is critical for a watertight connection. Without it, water will seep through gaps, causing leaks and potential damage to your home’s exterior or foundation.
How long does a slip joint last?
With quality materials and proper installation, a slip joint can last 10–20 years. Regular maintenance, such as cleaning and inspecting for corrosion, extends its lifespan.
Do I need a slip joint for every gutter section?
Not always. Slip joints are only needed where two gutter sections meet, where repairs are required, or to allow for thermal expansion in long runs. Seamless gutters may not require them unless extended.
Is DIY gutter repair safe for Auckland homeowners?
DIY repairs are safe for single-story homes if you follow safety protocols, such as securing ladders and wearing protective gear. For multi-story properties or complex issues, professional help is safer and more efficient.
How do I know if my gutters need replacing instead of a slip joint?
If gutters are extensively rusted, cracked, or sagging despite repairs, replacement may be necessary. A professional assessment from My Homes Construct can determine the best course of action.
Can I use a slip joint on seamless gutters?
Yes, but only for extensions or repairs. Seamless gutters are designed to minimise joints, so consult a professional to ensure compatibility and maintain system integrity.
Why Choose My Homes Construct?
My Homes Construct stands out as Auckland’s go-to gutter specialists for several reasons: Local expertise : We understand Auckland’s climate and building requirements, ensuring compliant and durable installations. Quality materials : We use rust-resistant, UV-stable components designed for NZ’s harsh conditions. Customer focus : From free consultations to post-installation support, we prioritise your satisfaction. Safety first : Our team is trained in working at heights, using industry-standard equipment to protect your property and our workers. Whether you’re tackling a DIY project or need pr
Gutter Help Across Auckland
Reading up is a smart first step, but every Auckland property is a little different. For advice tailored to your own home, My Homes Construct Ltd offers free assessments and written quotes for gutter cleaning, repair and replacement across all Auckland regions and suburbs.
We respond to enquiries the same business day, explain your options in plain language, and stand behind every job with a workmanship warranty — no pressure and no hidden costs.
When to Call a Professional
Plenty of gutter cleaning, repair and replacement tasks are fine to tackle yourself, but it's worth knowing where the line is. If a job involves working at height, structural elements, water getting where it shouldn't, or anything you're not fully confident about, bringing in a professional is usually cheaper than fixing a DIY attempt that didn't hold up.
A good tradesperson also spots the things an untrained eye misses — the early warning signs that turn a small job today into a major repair next winter. If you're in any doubt, a free assessment costs nothing and gives you a clear, honest picture before you commit to anything.
A Quick Checklist for Auckland Homeowners
Whatever you decide to do next, a few simple principles will save you money and stress on any gutter cleaning, repair and replacement job in Auckland. Act early — Auckland's wet, humid climate turns small problems into expensive ones faster than most people expect. Get it in writing — a clear, itemised written quote protects you and makes comparing options straightforward. Check it's a registered building company — it matters for quality, consent and warranty cover. Ask about the warranty — reputable Auckland tradespeople stand behind their workmanship, not just the materials. Think long-term value, not just the cheapest price — the lowest quote is rarely the best value once durability is factored in.
Keep these in mind and you'll avoid the most common — and most costly — mistakes we see on Auckland properties.
Need Professional Help in Auckland?
My Homes Construct Ltd provides expert gutter and full home-improvement services across all Auckland suburbs. Get a free, no-obligation quote today.