Imagine this: you’re sipping your morning coffee, enjoying the peace of your Auckland home, when you hear it—that relentless drip-drip-drip from a leaking gutter . It’s subtle at first, but the longer you ignore it, the bigger the problem grows. What starts as a minor annoyance can spiral into serious water damage, cracked foundations, or even a moldy basement. For Auckland homeowners, DIY enthusiasts, and property managers, a dripping gutter isn’t just a repair task—it’s a call to action.
Overview
Gutters are the unsung heroes of home maintenance, silently directing rainwater away from your roof, walls, and foundation. When they fail, the consequences can hit your wallet hard. But here’s the good news: most gutter leaks are fixable with a bit of effort and the right know-how. In this comprehensive guide, we’ll walk you through every step to identify and repair a dripping gutter, explore why leaks happen, and share expert tips to prevent them in the future. Whether you’re a hands-on DIYer or someone who’d rather call in the pros, we’ve got you covered. Let’s dive in and stop those leaks fast!
Why Fixing a Dripping Gutter is Crucial
A dripping gutter might seem like a small inconvenience—something you can put off until next weekend. But in Auckland’s damp, unpredictable climate, procrastination can lead to disaster. Here’s why acting quickly matters:
The Ripple Effect of Water Damage
Water is relentless. When a gutter leaks, it sends rainwater where it doesn’t belong—against your siding, into your foundation, or pooling near your home. Over time, this can:
- Weaken Your Foundation: Constant water exposure erodes soil and cracks concrete, costing thousands to repair.
- Ruin Exterior Walls: Dripping water strips paint, rots timber, and damages brickwork.
- Invite Mold and Mildew: Auckland’s humidity amplifies dampness, turning leaks into a breeding ground for health-hazardous mold.
Real-Life Consequences
Take John, an Auckland homeowner who ignored a dripping gutter for months. What started as a tiny seam leak turned into a soggy garage wall and a $2,000 repair bill for water-damaged framing. Or consider Maria, a property manager, who faced tenant complaints about basement flooding—all traced back to a clogged, overflowing gutter. These aren’t rare stories; they’re cautionary tales of what happens when gutter maintenance falls off the radar.
The Cost of Inaction vs. Action
Fixing a leak yourself might cost you an afternoon and $50 in supplies. Ignoring it? You’re looking at hundreds—or thousands—for professional water damage restoration. Plus, timely repairs boost your home’s resale value by showing it’s well-maintained. Whether you grab a ladder or call a gutter repair expert, addressing the issue now is a win for your home and your peace of mind.
Common Causes of Dripping Gutters
Before you start fixing, you need to know what’s broken. Gutter leaks don’t just happen—they’re the result of specific, often preventable issues. Let’s break down the most common culprits:
1. Clogged Gutters: The Silent Saboteur
Auckland’s lush greenery and frequent winds mean leaves, twigs, and dirt love to settle in your gutters. When debris builds up, water can’t flow to the downspout. Instead, it overflows or seeps through tiny gaps, creating drips. This is the number-one cause of leaks—and the easiest to fix.
2. Loose Gutter Joints or Damaged Seals
Gutters are typically installed in sections, connected at joints. Over time, screws loosen, caulking cracks, or seals degrade under UV rays and rain. A loose joint lets water sneak out, dripping down your walls or pooling below.
3. Cracks, Holes Cracks, Holes, or Corrosion : Wear and Tear Takes Its Toll
Metal gutters—common in older Auckland homes—rust over time. Plastic or vinyl gutters crack under sun exposure or physical damage (think a rogue ladder or a fallen branch). Even a pinhole-sized crack can turn into a steady drip during heavy rain.
4. Sagging or Misaligned Gutters: Gravity’s Revenge
Gutters should slope slightly toward the downspout for proper drainage. If brackets loosen or the fascia board shifts, the gutter sags or tilts the wrong way. Water spills over the edge instead of flowing where it’s meant to, leaving you with drips and overflows.
Bonus Culprit: Downspout Drama
A blocked or misaligned downspout can back water up into the gutter, forcing it out through seams or over the top. It’s a sneaky cause that’s often overlooked.
Pinpointing the problem is half the battle. Once you know why your gutter’s dripping, you’re ready to fix it—step by step.
Step-by-Step Guide: How to Fix a Dripping Gutter
Ready to roll up your sleeves? This DIY guide breaks the repair process into six manageable steps. You’ll need a ladder, gloves, a gutter scoop (or old trowel), a garden hose, gutter sealant, repair tape, screws, a screwdriver, and maybe a patch kit. Safety first: work on a dry day, secure your ladder, and avoid overreaching. Let’s get started.
✅ Step 1: Identify the Leak Source
You can’t fix what you can’t find. Here’s how to track down the drip:
- Hose Test: Climb up with a hose and run water through the gutter. Watch closely—mark drips with chalk or a marker. Check seams, corners, and the gutter’s underside.
- Visual Inspection: Look for cracks, rust, loose screws, or overflowing spots. Don’t forget the downspout—blockages here can cause upstream leaks.
Example: Auckland DIYer Tom thought his drip came from a seam. A hose test revealed a hidden crack under debris—problem solved once he knew where to focus.
✅ Step 2: Clean the Gutter Thoroughly
Clogs are a leak’s best friend. Clear them out:
- Scoop It: Use a gutter scoop, old trowel, or gloved hands to remove leaves, sludge, and twigs. Work from the downspout outward to avoid pushing debris deeper.
- Flush It: Hose down the gutter, starting at the far end and working toward the downspout. Water should flow freely—if it doesn’t, the downspout’s clogged (more on that later).
Pro Tip: Toss debris into a bucket clipped to your ladder—less mess to clean up later. Cleaning might even stop the drip entirely if clogs were the issue.
✅ Step 3: Seal Small Cracks and Holes
Found a crack or tiny hole? Seal it up:
- Gutter Sealant: Grab a silicone-based gutter sealant (available at Mitre 10 or Bunnings). Clean and dry the area, then apply a bead of sealant. Smooth it with a gloved finger for a watertight finish.
- Repair Tape: For a fast fix, use rubberized gutter repair tape. Cut to size, press it over the crack, and hold for 30 seconds. It’s flexible and weatherproof.
DIY Win: Sarah from Papakura sealed a pinhole leak with tape in 10 minutes—no drips since last winter!
Let the sealant cure (check the tube—usually 24 hours) before testing again.
✅ Step 4: Tighten Loose Gutter Joints
Leaking seams? Tighten them up:
- Screw Check: Use a screwdriver to tighten loose screws at joints. If they’re rusted or stripped, replace them with new gutter screws (galvanized or stainless steel for durability).
- Seam Sealer: Apply gutter seam sealer along the joint’s edge. Wipe excess with a rag for a clean look.
Common Mistake: Overtightening screws can crack plastic gutters—snug is enough.
✅ Step 5: Repair or Replace Damaged Sections
Big holes or sagging? Time for heavier lifting:
- Patch Large Holes: Clean the area, apply a gutter patch kit (metal or vinyl, depending on your gutter type), and seal edges with caulk. Smooth it for a tight bond.
- Fix Sagging: Check hangers every 60-90 cm. If they’re loose, tighten them into the fascia. Missing or bent? Install new gutter brackets—drill pilot holes for a secure fit.
- Replace Sections: For severe damage, cut out the bad section with tin snips. Measure and cut a matching replacement piece, then connect it with sealant and screws or rivets.
Safety Note: Wear gloves—metal edges are sharp. If replacing a long section, enlist a helper to hold it steady.
✅ Step 6: Check Downspouts and Ensure Proper Drainage
A leak-free gutter’s useless if water can’t escape:
- Unclog Downspouts: Feed a plumber’s snake or blast a hose from the bottom up to clear blockages. Test with water—it should pour out smoothly.
- Redirect Flow: Add splash blocks or gutter extensions (1.5-2 meters long) to push water away from your foundation. Angle them downhill for best results.
Real Fix: Mike in Henderson stopped foundation pooling by adding a $10 extension—simple but effective.
Test the whole system with a hose. No drips? You’re golden!
Preventative Tips to Avoid Future Gutter Leaks
Fixing a leak feels great, but preventing the next one feels better. Here’s how to keep your gutters in top shape:
Clean Twice a Year
Spring and fall are prime times—before and after Auckland’s stormiest seasons. Regular cleanings stop clogs before they start.
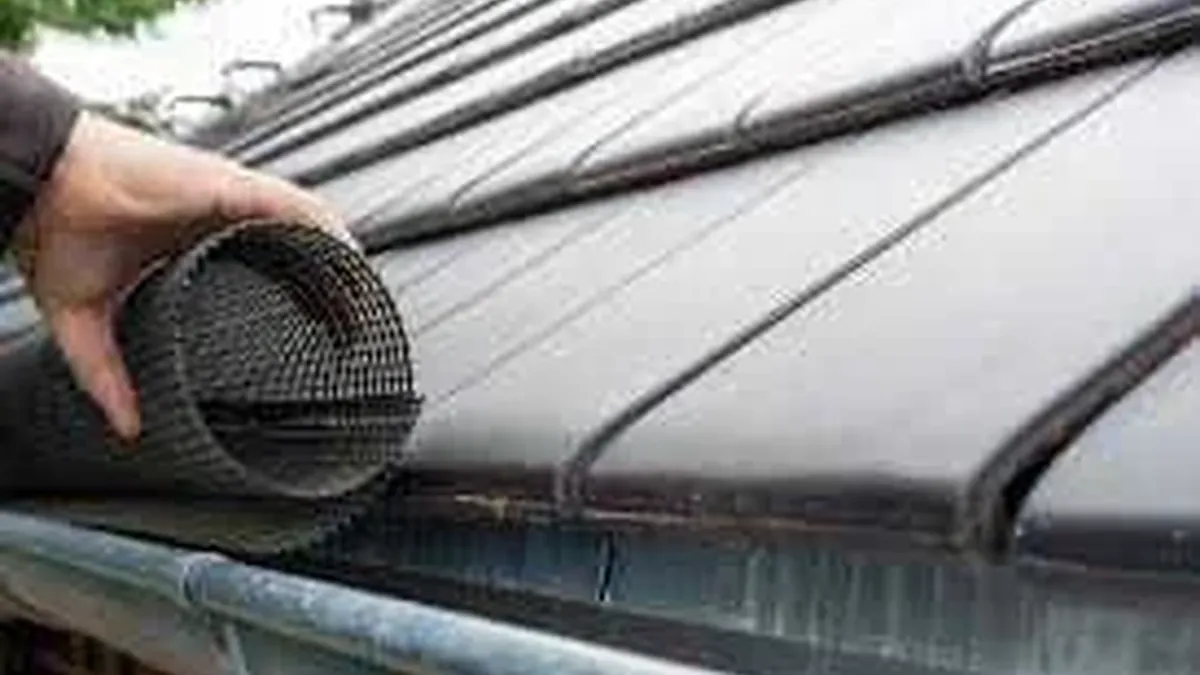
Install Gutter Guards
These mesh or perforated covers let water in but keep debris out. They’re a game-changer for homes under trees—just check they’re secure after big winds.
Inspect Regularly
Post-storm, grab a ladder and look for:
- Loose screws or hangers
- Cracked seals
- Early rust or sagging Fix small issues before they turn into drips.
Trim Overhanging Branches
Trees drop leaves and twigs—trim them back to lighten your gutter’s load.
Check Slope and Alignment
Use a level to ensure gutters slope slightly (1-2 cm per 3 meters) toward the downspout. Adjust hangers if needed.
A little effort now saves big repairs later. Think of it as weatherproofing your home for Auckland’s wild weather.
When to Call a Professional for Gutter Repair
DIY is empowering, but some jobs need a pro’s touch. Call for help if:
- Damage is Severe: Extensive rust, collapsed sections, or multiple large holes.
- Foundation’s at Risk: Water pools near your home despite repairs—drainage needs expert tweaking.
- Leaks Persist: You’ve tried everything, but drips keep coming.
- Safety’s an Issue: No ladder, bad balance, or high roofs? Don’t risk a fall.
Example: Lisa in Mt Eden tackled a sagging gutter herself but called pros when she found rot in the fascia board—smart move.
Auckland’s gutter repair experts, like My Homes Construct Ltd, bring tools, experience, and warranties to the table. They’ll spot issues you might miss and fix them fast.
Fix Your Dripping Gutters Today!
A dripping gutter isn’t just background noise—it’s a red flag for water damage, costly repairs, and stress you don’t need. With this in-depth DIY guide, you’ve got the tools to stop leaks fast, whether it’s a quick sealant job or a hanger tweak. Auckland homeowners, DIY enthusiasts, and property managers alike can take control and protect their properties from foundation cracks, siding rot, and mold.
Don’t let a small drip turn into a big problem. Follow these steps, maintain your gutters regularly, and enjoy a leak-free home. If the damage feels too big—or you’d rather skip the ladder—professional gutter repair services are just a call away. Act now, and keep your home dry, safe, and strong for years to come!

Frequently Asked Questions
📞 Need Expert Gutter Repair in Auckland?
Trust My Homes Construct Ltd for professional gutter repair and maintenance tailored to Auckland’s unique climate. From minor fixes to full replacements, we’ve got you covered. 🚀 Get a Free Quote Today! Call now and safeguard your home from leaks and water damage—don’t wait until it’s too late!
Gutter Help Across Auckland
Reading up is a smart first step, but every Auckland property is a little different. For advice tailored to your own home, My Homes Construct Ltd offers free assessments and written quotes for gutter cleaning, repair and replacement across all Auckland regions and suburbs.
We respond to enquiries the same business day, explain your options in plain language, and stand behind every job with a workmanship warranty — no pressure and no hidden costs.
When to Call a Professional
Plenty of gutter cleaning, repair and replacement tasks are fine to tackle yourself, but it's worth knowing where the line is. If a job involves working at height, structural elements, water getting where it shouldn't, or anything you're not fully confident about, bringing in a professional is usually cheaper than fixing a DIY attempt that didn't hold up.
A good tradesperson also spots the things an untrained eye misses — the early warning signs that turn a small job today into a major repair next winter. If you're in any doubt, a free assessment costs nothing and gives you a clear, honest picture before you commit to anything.
A Quick Checklist for Auckland Homeowners
Whatever you decide to do next, a few simple principles will save you money and stress on any gutter cleaning, repair and replacement job in Auckland. Act early — Auckland's wet, humid climate turns small problems into expensive ones faster than most people expect. Get it in writing — a clear, itemised written quote protects you and makes comparing options straightforward. Check it's a registered building company — it matters for quality, consent and warranty cover. Ask about the warranty — reputable Auckland tradespeople stand behind their workmanship, not just the materials. Think long-term value, not just the cheapest price — the lowest quote is rarely the best value once durability is factored in.
Keep these in mind and you'll avoid the most common — and most costly — mistakes we see on Auckland properties.
Need Professional Help in Auckland?
My Homes Construct Ltd provides expert gutter and full home-improvement services across all Auckland suburbs. Get a free, no-obligation quote today.